It was three years ago, and the heat was still clinging to the pavement even after sunset. I had spent the entire afternoon grilling burgers and wrestling with a stubborn propane tank, and by the time I finally looked at the clock, it was 7:30 PM. My guests were arriving in twenty minutes, and my dessert plan—a complicated fruit tart I’d been stress-baking over for weeks—had collapsed in the middle. Just like that. I was staring at a sad, soggy mess and feeling that specific brand of hostess panic that makes your palms sweat.
Then I looked at the cast iron skillet sitting on the counter. It was heavy, seasoned to a perfect black, and currently empty. I had some cornmeal, eggs, butter, and honey left. I didn’t have time to bake anything delicate. I just needed something hot, something comforting, something that smelled like home and made people forget about the tart disaster.
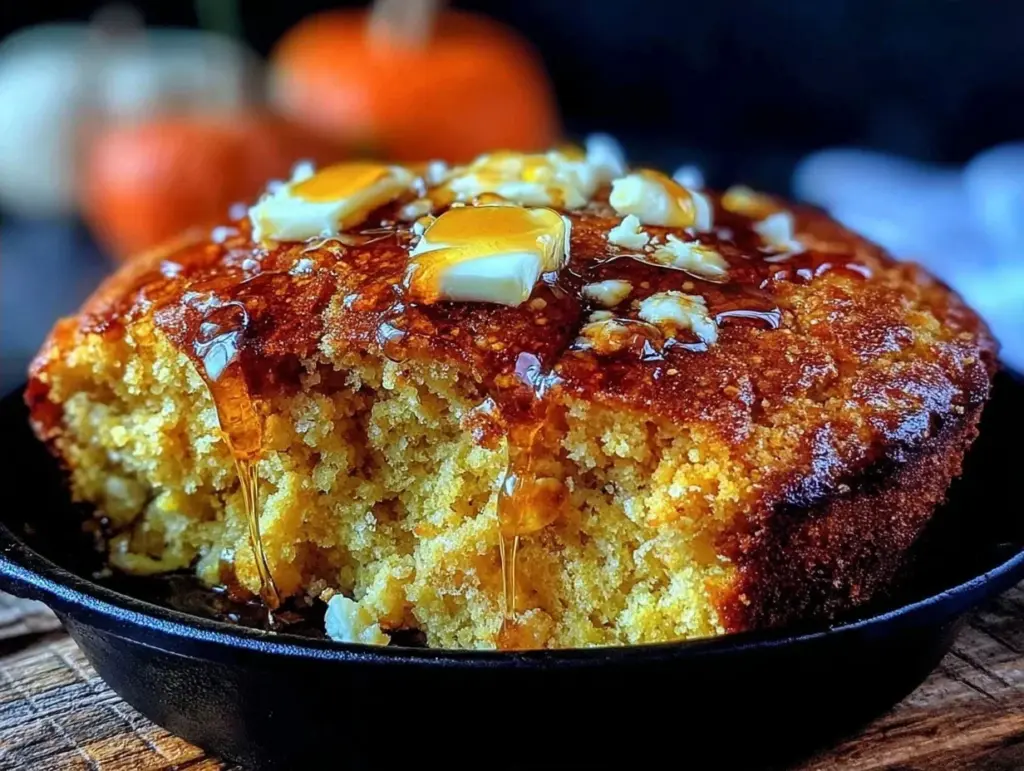
I whipped up this Labor Day Cast Iron Skillet Cornbread with Honey Butter in under fifteen minutes. I slid it into the oven, and within twenty minutes, the entire house smelled like a bakery. When my friends walked in, they didn’t ask about the tart. They grabbed slices of cornbread straight from the pan, dripping it with that warm honey butter, and stood around the island laughing. It was the perfect end to a chaotic day. It was rustic, it was indulgent, and it was exactly what everyone needed.
That night changed how I approach hosting. I realized that sometimes the most impressive dishes aren’t the ones that look perfect on a platter. They’re the ones that come out of the oven bubbling, with a crust that cracks satisfyingly under your fork. This cornbread has become my go-to for every gathering since. Whether it’s a casual backyard BBQ, a cozy Sunday night, or a holiday dinner, it always wins. It’s sweet but savory, crisp on the outside and tender on the inside, and it tastes like summer itself.
If you’ve been making dry, cakey cornbread that crumbles apart, stop. Right now. This recipe is different. It’s rich, it’s buttery, and that honey butter? It’s not just a topping. It’s a game-changer. I’ve tested this recipe dozens of times—sometimes with buttermilk, sometimes with yogurt, sometimes with just milk—but this specific ratio is the one that creates that golden, caramelized edge you dream about. Let me show you how to make it.
Why You’ll Love This Cast Iron Cornbread
There’s a reason cast iron cornbread is the king of Southern comfort food. It’s not just tradition; it’s physics. The iron retains heat like nothing else, creating a crust that is literally uncrackable. Here’s why this recipe has earned a permanent spot in my rotation:
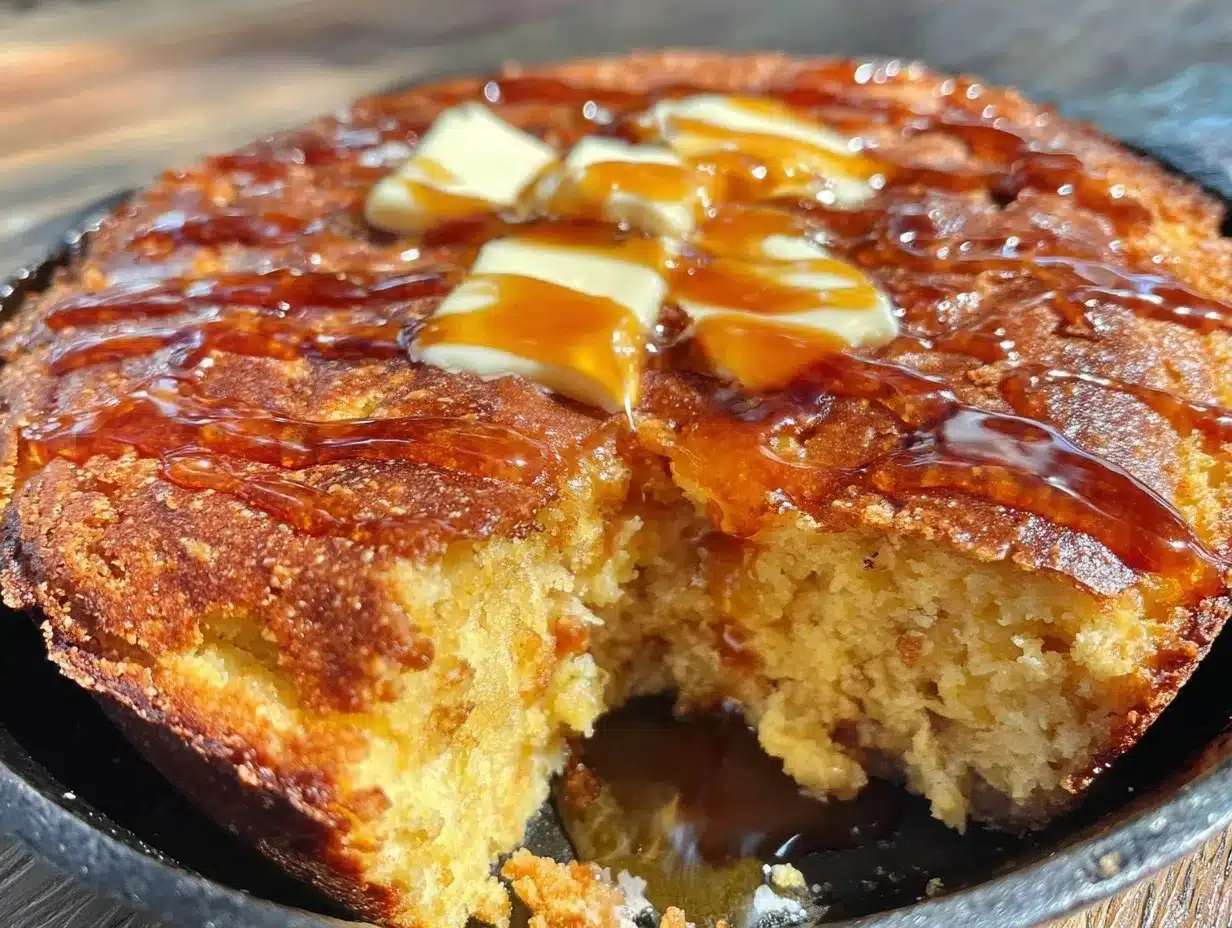
The Honey Butter Factor — This isn’t just melted butter with a spoonful of sugar. This is softened butter whipped with warm honey until it’s spreadable, glossy, and addictive. I’ve served this to people who claim they “don’t like sweet things,” and they’ve gone back for thirds. It’s the kind of condiment that makes people ask for the recipe.
That Crisp, Golden Edge — When you pull the skillet out of the oven, you’ll see that deep amber crust around the rim. It’s salty, sweet, and crunchy. It contrasts perfectly with the soft, steamed center. It’s the part everyone fights over. I learned that if you don’t scrape the edges off first, you might end up in a food fight.
Stays Warm for Hours — Because it’s in the cast iron, it doesn’t cool down quickly. You can pull it out of the oven, set it on the table, and serve it throughout the meal. It doesn’t get soggy or stale. It just gets better. This is crucial for parties where people eat at different times.
Actually Moist — Many cornbread recipes use oil, which keeps it moist but can feel greasy. This recipe uses butter and a touch of buttermilk (or sour cream) to create a tender crumb that feels rich without being heavy. It’s the texture of a good biscuit, not a dry cake.
Zero Fuss — You don’t need a mixer. You don’t need to sift anything. You just mix dry, mix wet, combine, and bake. It’s the kind of recipe that lets you actually enjoy your guests instead of hiding in the kitchen.
This is the dish that turns a simple meal into a celebration. It’s shareable, it’s nostalgic, and it’s guaranteed to make your house smell incredible. I promise you, once you try this, you’ll never go back to boxed mixes or square pans again.
Ingredients You’ll Need
Before we get to the skillet, let’s talk about what goes in. I’m particular about a few things here, mostly because I’ve learned the hard way what leads to disappointment. You don’t need fancy ingredients, but you do need quality ones.
For the Cornbread
Yellow Cornmeal (1 cup / 140g) — This is non-negotiable. Do not use fine corn flour or polenta. You want medium-grain yellow cornmeal for that authentic crunch and texture. I use stone-ground cornmeal when I can find it because it has more flavor, but any good quality yellow cornmeal works.
All-Purpose Flour (1 cup / 125g) — This keeps the cornbread from being too crumbly. Cornmeal alone can fall apart. The flour acts as the glue. Don’t skip it unless you want a dense, heavy brick.
Baking Powder (1 tablespoon) — Fresh baking powder is key. If yours is older than six months, it won’t rise properly. I keep a new can on hand specifically for baking. You want a good lift.
Baking Soda (½ teaspoon) — This reacts with the buttermilk to create those air bubbles. It also helps with browning.
Salt (1 teaspoon) — Essential. Cornbread needs salt to balance the sweetness. Use kosher salt if you have it; it’s easier to control.
Unsalted Butter (½ cup / 115g, melted) — Plus extra for greasing the pan. Melted butter gives a richer flavor than oil. I use European-style butter when I want to treat myself—it has a higher fat content and tastes incredible.
Buttermilk (1 cup / 240ml) — This is the secret to tenderness. The acid in the buttermilk tenderizes the gluten and reacts with the baking soda. If you don’t have buttermilk, add 1 tablespoon of lemon juice or white vinegar to regular milk and let it sit for 10 minutes. It’s a great hack.
Large Eggs (2) — Room temperature eggs incorporate better. Don’t use cold eggs straight from the fridge; they can shock the batter.
Sugar (¼ cup / 50g) — Just enough to highlight the corn, not make it a dessert. I use granulated white sugar. Brown sugar works too but makes it denser.
For the Honey Butter
Unsalted Butter (½ cup / 115g, softened) — Softened, not melted. You want it creamy. If it’s melted, it won’t whip up properly.
Honey (3 tablespoons) — Use a mild honey like clover or orange blossom. Avoid strong buckwheat honey; it will overpower the cornbread. The honey adds a floral sweetness that pairs perfectly with the savory corn.
Pinch of Sea Salt — Just a tiny pinch to cut the sweetness. It makes the honey flavor pop.
Equipment Needed
You don’t need a lot of fancy gadgets for this. In fact, the less equipment, the better.
10-inch Cast Iron Skillet — This is the star. A 10-inch skillet gives you the perfect depth and surface area for that crispy edge. If you only have a 12-inch, you’ll get a thinner cornbread with less crust. If you have an 8-inch, it’ll be thicker and take longer to bake. Aim for 10-inch.
Mixing Bowls — Two medium bowls. One for dry, one for wet. I use glass bowls because they’re easy to see into.
Whisk — For beating the eggs and buttermilk together. A fork works too, but a whisk is faster.
Wooden Spoon or Spatula — For mixing the batter. Don’t overmix! Just combine until no dry flour remains. Overmixing makes tough cornbread.
Measuring Cups and Spoons — Standard stuff. If you want precision, use a kitchen scale, but volume measurements work fine here.
Pastry Brush — Optional, but nice for greasing the skillet with butter. It coats the pan evenly.
How to Make It: Step-by-Step
Alright, let’s make this! I’m walking you through exactly how I do it, including the little tricks I’ve picked up over the years.
Step 1: Preheat the Skillet (10 minutes)
This is the most important step. Place your empty cast iron skillet in the oven and preheat it to 425°F (220°C). Let it heat up for at least 10 minutes. The skillet needs to be hot when the batter hits it. This creates that immediate sizzle and helps form the crust. If you skip this, you’ll get a steamed, soft bottom instead of a crispy one.
Step 2: Mix the Dry Ingredients
In a medium bowl, whisk together the cornmeal, all-purpose flour, baking powder, baking soda, and salt. Make sure there are no lumps of baking powder. Whisking ensures even distribution of leavening agents, which means even rising. Set this aside.
Step 3: Mix the Wet Ingredients
In a separate bowl, whisk the melted butter, eggs, buttermilk, sugar, and honey until smooth. The mixture should be liquid and homogeneous. If you’re using homemade buttermilk, give it a quick stir before measuring to ensure the curds are mixed back in.
Step 4: Combine the Batter
Pour the wet ingredients into the dry ingredients. Gently fold them together with a wooden spoon or spatula. Stop as soon as the last streaks of flour disappear. The batter will be thick and slightly lumpy. That’s okay. Do not overmix. Overmixing develops gluten, which makes the cornbread tough and chewy instead of tender and crumbly.
Step 5: Pour and Bake
Carefully remove the hot skillet from the oven (use oven mitts!). Pour the batter into the center of the skillet. It will sizzle immediately. That’s a good sign. Use your spatula to spread the batter evenly to the edges. Place the skillet back in the oven and bake for 20-25 minutes.
Step 6: Check for Doneness
The cornbread is done when the top is golden brown and a toothpick inserted into the center comes out clean or with just a few moist crumbs. The edges should be pulling away slightly from the skillet. If the top is browning too fast, you can tent it loosely with foil for the last 5 minutes.
Step 7: Make the Honey Butter
While the cornbread bakes, make the honey butter. In a small bowl, mash the softened butter with a fork until creamy. Add the honey and sea salt. Whisk vigorously until the mixture is light, fluffy, and well combined. It should be pale and spreadable. Taste it and adjust honey or salt if needed.
Step 8: Serve
Remove the skillet from the oven and let it cool for 5 minutes. This allows the cornbread to set slightly so it doesn’t fall apart when sliced. Slice it into wedges, right in the pan. Serve warm, with a generous dollop of honey butter on each slice. Watch it disappear.
Expert Tips & Tricks
Here’s everything I’ve learned from making this dozens of times. These tips will save you from my mistakes.
Don’t Skip the Hot Skillet
I know it seems scary to put a hot pan in the oven, but it’s the secret to the crust. The thermal shock creates a immediate rise and a crispy bottom. If you’re nervous about splatter, pour the batter quickly and get the pan back in the oven fast. It’s worth it.
Room Temperature Ingredients Matter
Cold eggs and cold buttermilk can cause the melted butter to seize up into little chunks. If your ingredients are cold, warm them slightly. Room temperature ingredients emulsify better, creating a smoother, more uniform batter.
Listen to the Sizzle
When you pour the batter into the hot skillet, it should hiss loudly. If it doesn’t sizzle, your pan isn’t hot enough. Put it back in the oven for 5 more minutes before pouring. The sizzle is your indicator that the crust is forming.
Let It Rest
Resist the urge to cut it immediately. Hot cornbread is fragile. Letting it rest for 5-10 minutes allows the structure to set. You’ll get cleaner slices and a better texture.
Storage Tip
If you have leftovers (unlikely, but possible), store them in an airtight container at room temperature for up to 2 days. Reheat in a toaster oven or skillet to restore the crispness. Do not microwave it unless you want it chewy.
Variations & Substitutions
Once you’ve nailed the basic version, here’s how you can mix it up. I’ve tried all of these.
Jalapeño Cornbread
Add 1 diced jalapeño (seeds removed for less heat) and ½ cup shredded cheddar cheese to the batter. It’s spicy, cheesy, and perfect for BBQs. I make this for my spice-loving friends.
Hickory Smoked Bacon
Cook 4 slices of bacon until crispy, crumble it, and fold it into the batter. The smoky saltiness pairs beautifully with the sweet honey butter. This is my husband’s favorite version.
Maple Butter Variation
Swap the honey for pure maple syrup in the butter. Add a pinch of cinnamon. It tastes like autumn and is amazing with this cornbread. I serve this during fall gatherings.
Gluten-Free Option
Substitute the all-purpose flour with a 1:1 gluten-free flour blend. Use cornmeal that is certified gluten-free. The texture will be slightly more delicate, but it still works well.
Dairy-Free
Use dairy-free butter and oat milk (or almond milk) with lemon juice for the buttermilk substitute. The honey butter can be made with dairy-free butter. It’s not quite the same richness, but it’s still good.
Serving & Storage
How to serve this masterpiece:
How to Serve:
I usually serve this straight from the skillet at the dinner table. It looks rustic and stays warm. But here are other ways I’ve enjoyed it:
Side Dishes:
– Fried chicken (obviously)
– Smothered pork chops
– Chili or beans
– Grilled vegetables
– A simple green salad with vinaigrette
Toppings Bar:
When I have guests, I put out: extra honey butter, crumbled bacon, diced jalapeños, shredded cheddar, and fresh chives. Everyone customizes their slice.
Wine Pairing:
Not a wine expert, but my wine-snob friend says a crisp Pinot Grigio or a buttery Chardonnay works great with this. For beer, a lager or a light IPA is perfect.
Storage Instructions:
Refrigerator:
Store in an airtight container for up to 3 days. It will dry out slightly. Reheat in a toaster oven or skillet to restore crispness.
Freezing:
Yes, it freezes well! Wrap slices tightly in plastic wrap and then foil. Freeze for up to 3 months. Thaw at room temperature and reheat in the oven.
Pro tip:
If you’re serving this at a party, make two batches. One to serve warm, and one to cool completely and wrap for later. People love warm bread, but leftovers are just as good reheated.
Nutrition Information
I’m not a nutritionist, but here’s the breakdown if you’re tracking. Keep in mind this is an estimate.
Per Serving (based on 8 servings):
- Calories: 280
- Protein: 5g
- Carbs: 35g
- Fiber: 2g
- Sugar: 6g
- Fat: 14g
- Saturated Fat: 8g
- Cholesterol: 65mg
- Sodium: 320mg
What’s Good:
- Decent carbs for energy
- Contains some protein from eggs and cheese (if added)
- Can be made lighter by reducing butter
What to Know:
- Higher in calories from butter and honey
- Contains dairy and gluten
- Moderate sodium
My Take:
Look, this is comfort food. It’s butter and corn and honey. It’s not a diet recipe. But it’s way better than store-bought, costs less, and I know exactly what’s in it. When I want to make it lighter, I reduce the butter by 25% and add more vegetables. But usually? I just eat a slice and enjoy it. It’s worth it.
Final Thoughts
So that’s my Labor Day Cast Iron Skillet Cornbread with Honey Butter! I’ve probably talked your ear off at this point, but when you make a recipe this often, you have a lot to say about it.
This has saved dinners more times than I can count. It’s my answer to “what’s for dessert?” or “what side dish can I make quickly?” when I’m tired, don’t want takeout, and still want something that tastes really good. My kids are happy, my husband’s happy, and I’m happy because I’m not stressed about cooking.
Make it yours! Try different add-ins, swap in your favorite vegetables, adjust the honey. The best recipes are the ones you adapt to your family’s tastes. If you try this, I hope it becomes a tradition in your home, just like it did in mine. Happy cooking! And I hope your kitchen smells half as good as mine does right now.
Frequently Asked Questions
Can I use white cornmeal instead of yellow?
Yes! White cornmeal has a slightly sweeter, more delicate flavor. It will look paler, but the taste is still delicious. Some people prefer it for a more traditional Southern look. Just make sure it’s the same grind size as yellow cornmeal.
Why did my cornbread turn out dry?
Overbaking is the most common cause. Cornbread continues to cook even after you take it out of the oven. Pull it when the toothpick comes out with just a few moist crumbs. Also, check your baking powder. Old baking powder won’t create enough lift, leaving it dense and dry.
Can I make this ahead of time?
You can bake it ahead and reheat it. Bake it, let it cool completely, wrap it tightly in foil, and store at room temperature for up to 2 days. Reheat in a 350°F oven for 10-15 minutes. The honey butter is best made fresh, but you can make it a day ahead and store it in the fridge. Let it come to room temperature before serving.
Why did my cornbread stick to the skillet?
If your cast iron is well-seasoned, it should be naturally non-stick. Make sure you grease the hot skillet generously with butter before pouring the batter. If you’re using a new skillet, it might need more seasoning. Also, don’t try to cut it immediately. Let it cool for 5 minutes so it releases naturally.
Can I use buttermilk powder?
Yes! Mix 1 cup of milk with 2 tablespoons of buttermilk powder. Let it sit for 10 minutes. It works just as well as fresh buttermilk. This is a great trick for keeping buttermilk on hand without worrying about it spoiling.
Is this recipe gluten-free?
The base recipe contains all-purpose flour, so it’s not gluten-free. However, you can substitute the flour with a 1:1 gluten-free blend. The texture will be slightly more delicate, but it will still rise and taste great. Just make sure your cornmeal is certified gluten-free.
Can I freeze the honey butter?
Yes! The honey butter can be frozen for up to 3 months. Store it in an airtight container. Thaw it in the fridge overnight and let it come to room temperature before serving. The texture might change slightly, but the flavor will be just as good.
Pin This Recipe!

Perfect Labor Day Cast Iron Cornbread with Honey Butter
- Total Time: 40 minutes
- Yield: 8 servings 1x
Description
A rustic, moist, and buttery cornbread baked in a hot cast iron skillet for a crispy, golden edge, served with a sweet and savory honey butter.
Ingredients
- 1 cup (140g) yellow cornmeal
- 1 cup (125g) all-purpose flour
- 1 tablespoon baking powder
- ½ teaspoon baking soda
- 1 teaspoon salt
- ½ cup (115g) unsalted butter, melted (plus extra for greasing)
- 1 cup (240ml) buttermilk
- 2 large eggs, room temperature
- ¼ cup (50g) granulated sugar
- ½ cup (115g) unsalted butter, softened (for honey butter)
- 3 tablespoons honey
- Pinch of sea salt (for honey butter)
Instructions
- Preheat the oven to 425°F (220°C). Place a 10-inch cast iron skillet in the oven to heat for at least 10 minutes.
- In a medium bowl, whisk together the cornmeal, all-purpose flour, baking powder, baking soda, and salt.
- In a separate bowl, whisk the melted butter, eggs, buttermilk, sugar, and honey until smooth.
- Pour the wet ingredients into the dry ingredients. Gently fold together with a wooden spoon or spatula until just combined; do not overmix.
- Carefully remove the hot skillet from the oven. Pour the batter into the center of the skillet (it will sizzle) and spread evenly to the edges.
- Bake for 20-25 minutes until the top is golden brown and a toothpick inserted into the center comes out clean.
- While the cornbread bakes, mash the softened butter for the honey butter until creamy. Whisk in the honey and a pinch of sea salt until light and fluffy.
- Remove the cornbread from the oven and let it cool in the pan for 5 minutes to set.
- Slice into wedges and serve warm with a generous dollop of honey butter.
Notes
Ensure the cast iron skillet is preheated to create a crispy crust. Do not overmix the batter to avoid tough cornbread. Let the cornbread rest for 5 minutes before slicing to prevent crumbling. For a gluten-free version, substitute all-purpose flour with a 1:1 gluten-free blend.
- Prep Time: 15 minutes
- Cook Time: 25 minutes
- Category: Side Dish
- Cuisine: Southern
Nutrition
- Serving Size: 1 wedge
- Calories: 280
- Sugar: 6
- Sodium: 320
- Fat: 14
- Saturated Fat: 8
- Carbohydrates: 35
- Fiber: 2
- Protein: 5
Keywords: cast iron cornbread, honey butter, southern comfort food, labor day recipe, skillet cornbread, homemade cornbread


