Last October, I stood in my kitchen at 11 PM, staring at a baking sheet that had somehow caught fire. It wasn’t a dramatic, Hollywood-style inferno, just a small, angry flare-up from a spilled batch of caramelized sugar. I was trying to make individual apple pies for a potluck the next day, and I had underestimated how much sugar burns. I ended up ordering pizza, eating it cold on the floor, and vowing never to make a crumble dessert again.
Fast forward six months. I was feeling nostalgic for that crisp autumn air and the smell of cinnamon in the house, but I didn’t have the energy to deal with pie crusts or burnt sugar. I needed something that tasted like fall but didn’t require a degree in pastry arts. So, I threw together what I thought would be a mediocre, lazy dessert. I used canned apple pie filling (don’t judge me, I was tired), some oats I had lying around, and a jar of caramel sauce.
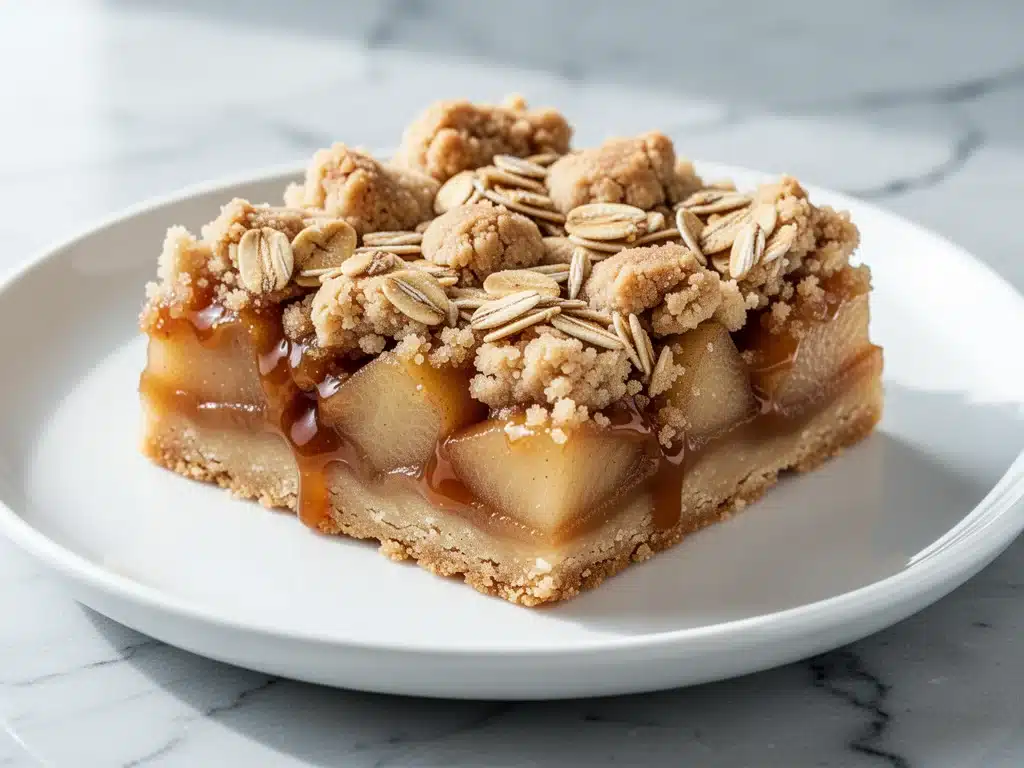
Thirty minutes later, my husband walked in, took one bite of a fall caramel apple crumble bar, and actually stopped mid-chew. He looked at me, looked at the bar, and said, “Okay, what is this? This tastes like a bakery in Vermont.”
That was the moment I discovered that sometimes the best recipes happen when you stop overthinking and start combining pantry staples. This fall caramel apple crumble bars recipe has become our go-to for everything from Sunday morning coffee breaks to last-minute dinner party desserts. It takes 30 minutes to make, uses ingredients I always have on hand, and tastes like something from an upscale farmers market. I’ve made it at least a dozen times since that burnt-sugar incident, tweaking the oat ratio and the caramel thickness until it was perfect.
What started as a lazy midnight snack has turned into a family tradition. We make these every time the leaves start turning. They’re portable, they’re messy in the best way, and they’re incredibly forgiving. If you’re looking for a dessert that feels indulgent but is actually stupid simple, you need to try this.
Why You’ll Love This Recipe
There are about ten reasons I keep making these bars, but here are the big ones that convinced me to write this down properly.
Stupid Simple — Seriously, if you can dump ingredients into a bowl and press them into a pan, you can make this. I’ve walked my teenage daughter through it over FaceTime while she was at college. No mixing bowls required for the streusel if you’re feeling extra lazy (though mixing it gives better texture). It’s genuinely foolproof.
Perfectly Portable — Unlike a slice of pie that slides around on a plate, these bars hold their shape. I cut them into neat squares and pack them in a tin for my book club. They travel well, they don’t get soggy (mostly), and everyone can grab one without needing a fork.
Lightning Fast — 30 minutes from start to finish, and only 15 of those are active prep. The baking time is hands-off. I make this on weeknights when I get home at 7pm and need to feel like I accomplished something culinary without spending hours in the kitchen.
Pantry-Friendly — You probably have 90% of these ingredients already. I keep oats, butter, brown sugar, and applesauce or apple filling stocked just so I can make this on a whim. The caramel sauce is the only specialty item, and even that is easy to find or swap.
Makes Amazing Leftovers — Actually tastes better the next day. The flavors meld together overnight, making the caramel soak deeper into the oat base. I deliberately make a double batch for lunch throughout the week. It’s like a healthy-ish snack if you ignore the sugar.
This is my go-to when I need dessert to just work. No complicated techniques, no weird ingredients, just reliable, delicious food that makes everyone happy.
Ingredients You’ll Need
Here’s the best part: you probably have most of this already. I’m particular about two ingredients here—the oats and the caramel—and I’ll tell you exactly why.
For the Oat Crust and Topping
Old-Fashioned Rolled Oats (2 cups / 160g) — Do not use instant oats. They turn to mush. Do not use steel-cut oats. They stay hard. You need the chewy, substantial texture of old-fashioned oats. I buy the store brand because it’s the same stuff as the fancy names.
All-Purpose Flour (1 cup / 125g) — Just standard white flour. It gives the crust structure so it doesn’t crumble apart when you pick it up.
Unsalted Butter (½ cup / 113g, melted) — Use real butter. Margarine will make this greasy and sad. Melt it in the microwave—it’s faster than softening.
Granulated Sugar (½ cup / 100g) — For the base, this keeps it from being too sweet. You want the oats to shine.
Brown Sugar (1 cup / 200g, packed) — This is for the streusel topping. It adds that molasses depth and chewiness. Dark brown is better if you have it.
Cinnamon (1 teaspoon) — Essential for the fall vibe. Don’t skip it.
Salt (½ teaspoon) — Just a pinch to balance the sweetness. It makes the flavor pop.
For the Apple Caramel Filling
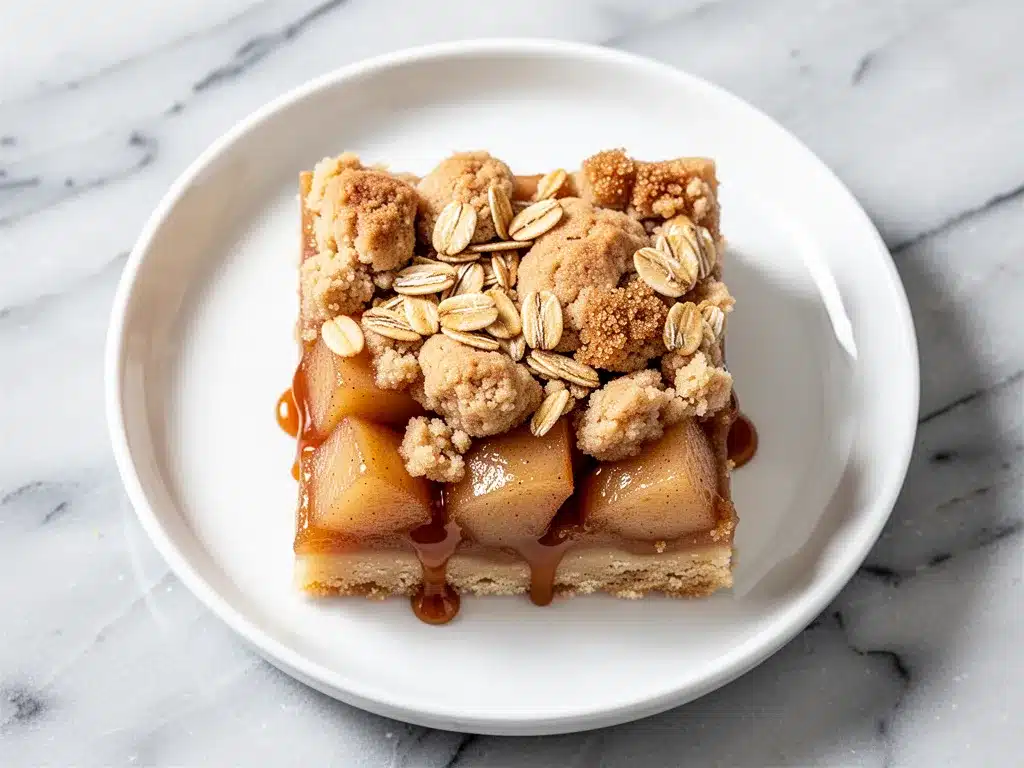
Apple Pie Filling (21 oz / 600g can) — I use the canned stuff because it’s already spiced and cooked. It saves me from peeling eight apples. If you want to use fresh apples, see the variations below.
Caramel Sauce (12-14 oz / 350-400g) — I use the Nestlé Toll House caramel bits or a jar of La Flor de Caña caramel sauce. Store-bought is fine here. Making caramel from scratch is risky (remember my burnt sugar incident?).
Equipment Needed
You don’t need fancy equipment for this. Here’s what I actually use.
9×13 Inch Baking Pan — A standard glass or metal pan works best. I prefer glass because it browns the bottom evenly. Line it with parchment paper for easy removal later.
Mixing Bowl — One large bowl is all you need for the oat mixture.
Pastry Blender or Fork — To mix the oats and butter. A fork works if you’re lazy, but a pastry blender is faster.
Spatula — For spreading the apple filling and caramel.
Chef’s Knife — For cutting the bars into squares. A serrated knife works better if the caramel is still a bit soft.
How to Make It: Step-by-Step
Alright, let’s make this! I’m walking you through exactly how I do it, including the little tricks I’ve picked up.
Step 1: Prep Your Pan and Oven (2 minutes)
Preheat your oven to 350°F (175°C). Line your 9×13 pan with parchment paper, leaving an overhang on the long sides. This is crucial for lifting the bars out later. Grease the parchment lightly with butter or cooking spray.
Step 2: Make the Oat Base (3 minutes)
In your mixing bowl, combine the oats, flour, granulated sugar, and salt. Pour in the melted butter and mix until it looks like wet sand. Press this mixture firmly and evenly into the bottom of your prepared pan. You want it packed down tight so it doesn’t fall apart.
Step 3: Bake the Crust (10 minutes)
Bake the crust for 10 minutes. It won’t look brown yet, just set. This par-bakes the bottom so it stays crispy when you add the wet filling. Remove from the oven but leave it on the counter.
Step 4: Add the Apple Filling (2 minutes)
Spread the canned apple pie filling evenly over the hot crust. Don’t worry if it’s messy; it will smooth out. If you’re using fresh apples, sauté them with sugar and cinnamon first until tender, then spread.
Step 5: Add the Caramel (2 minutes)
Drizzle or spread the caramel sauce over the apples. Use a knife or offset spatula to gently swirl it into the apples. You don’t need to cover every square inch; pockets of caramel are better than a thick, gummy layer.
Step 6: Top with Streusel (3 minutes)
In a separate bowl (or the same one if you’re washing less), mix the brown sugar, cinnamon, and remaining oats/flour if you have any left (some recipes use all oats for topping, but I like the flour for structure). Dot this mixture over the caramel layer. It doesn’t need to cover everything; rustic is good.
Step 7: Bake Until Golden (20-25 minutes)
Return to the oven and bake for 20-25 minutes. You’ll know it’s done when the top is golden brown and the caramel is bubbling up through the oats. Let it cool completely in the pan. This is the hardest part, but it’s necessary for clean cuts.
Expert Tips & Tricks
Here’s everything I’ve learned from making this dozens of times. These tips will save you from my mistakes.
Don’t Skip the Par-Bake
I used to skip baking the crust first, and the bottom got soggy. Par-baking for 10 minutes creates a barrier between the wet apples and the oat base. It’s a small step that makes a huge difference.
Chill Before Cutting
The caramel is liquid hot when it comes out of the oven. If you cut it now, you’ll get a mess. Let it cool for at least 2 hours, or better yet, refrigerate it for an hour. Cold bars cut cleanly.
Use Parchment Paper
Caramel sticks to everything. Parchment paper is your best friend. If you don’t use it, you’ll be scraping burnt sugar off your pan for days.
Swirl, Don’t Spread
When adding the caramel, don’t try to make a perfect layer. Swirl it into the apples. This creates pockets of flavor and prevents the bars from becoming a solid block of sugar.
Variations & Substitutions
Once you’ve nailed the basic version, here’s how you can mix it up. I’ve tried all of these.
Fresh Apple Version
Instead of canned filling, use 4-5 large Granny Smith apples, peeled and thinly sliced. Toss with 2 tablespoons sugar and 1 teaspoon cinnamon. Sauté them in a pan for 5 minutes to soften before adding to the crust. This tastes more like a pie.
Pumpkin Spice Twist
Swap the apple filling for canned pumpkin puree. Add 1 teaspoon pumpkin pie spice to the streusel. It’s like a pumpkin bar but with oat texture. Great for November.
Chocolate Lovers
Add a layer of chocolate chips between the apples and the caramel. Or drizzle melted chocolate over the top after baking. The combo of apple, caramel, and chocolate is unbeatable.
Gluten-Free
Use gluten-free oats and gluten-free flour. Most store-bought oats are processed in facilities with wheat, so check the label if you’re celiac. Otherwise, it’s naturally GF-friendly.
Reduced Sugar
Use unsweetened applesauce mixed with cinnamon instead of pie filling. Use a sugar-free caramel sauce. It’s not as indulgent, but it’s lighter.
Serving & Storage
How to Serve:
I usually serve these warm with a scoop of vanilla ice cream. The contrast of hot caramel and cold ice cream is amazing. But they’re also great at room temperature for potlucks.
Side Dishes:
Pair with a cup of spiced apple cider for the ultimate fall experience. A simple green salad balances the sweetness if you’re serving it after dinner.
Storage:
Store in an airtight container at room temperature for up to 3 days. The caramel keeps it moist. For longer storage, refrigerate for up to 5 days. Let it come to room temperature before eating for the best texture.
Freezing:
These freeze beautifully! Cut them into bars, wrap individually in plastic wrap, then put them in a freezer bag. They’ll last for 2 months. Thaw at room temperature or microwave for 10 seconds.
Nutrition Information
I’m not a nutritionist, but here’s the breakdown if you’re tracking. These are bars, so expect some sugar.
Per Serving (based on 12 bars):
– Calories: 280
– Protein: 3g
– Carbs: 42g
– Fiber: 2g
– Sugar: 28g
– Fat: 12g
– Saturated Fat: 7g
– Cholesterol: 25mg
– Sodium: 150mg
It’s a sweet treat, not a health food. But it’s better than store-bought bars because you control the ingredients. When I want to make it lighter, I use less caramel and more apples.
Final Thoughts
So that’s my go-to fall caramel apple crumble bars! I’ve probably talked your ear off at this point, but when you make a recipe this often, you have a lot to say about it.
This has saved dessert nights more times than I can count. It’s my answer to “what’s for dessert” when I’m tired, don’t want to bake a cake, and still want something that tastes really good. My kids are happy, my husband’s happy, and I’m happy because I’m not stressed about cooking.
Make it yours! Try different add-ins, swap in your favorite apples, adjust the cinnamon. The best recipes are the ones you adapt to your family’s tastes. If you make this, drop a comment and let me know what you think! I love hearing how recipes turn out in your kitchen.
Happy baking! And I hope your kitchen smells half as good as mine does right now.
Frequently Asked Questions
Can I use fresh apples instead of canned filling?
Yes! Use 4-5 large apples, peeled and sliced thin. Toss them with sugar and cinnamon, then cook them in a pan for 5-7 minutes until tender before spreading on the crust. Canned is easier, but fresh tastes more like pie.
Why did my bars fall apart when I cut them?
They probably weren’t cooled enough. The caramel is liquid when hot. Let them cool completely, or better yet, refrigerate for an hour. Use a sharp knife and wipe it between cuts for clean squares.
Can I make this ahead of time?
Absolutely. Make them 2 days ahead and store in the fridge. They actually taste better the next day as the flavors meld. Bring to room temperature before serving.
What kind of caramel sauce works best?
I use Nestlé Toll House caramel bits or a jar of La Flor de Caña. Any thick, pourable caramel sauce works. Avoid thin, runny sauces as they’ll make the bars soggy.
Can I freeze these bars?
Yes! Freeze them after they’re completely cooled. Wrap individually in plastic wrap and store in a freezer bag for up to 2 months. Thaw at room temperature.
Is there a gluten-free option?
Yes! Use gluten-free oats and gluten-free flour. Check the oat package to ensure they’re certified GF. The rest of the ingredients are naturally gluten-free.
Pin This Recipe!

Fall Caramel Apple Crumble Bars
- Total Time: 45 minutes
- Yield: 12 servings 1x
Description
A foolproof, pantry-friendly dessert that combines a buttery oat crust with spiced apple filling and rich caramel sauce. Ready in just 30 minutes, these bars are perfect for fall gatherings and make excellent leftovers.
Ingredients
- 2 cups (160g) Old-Fashioned Rolled Oats
- 1 cup (125g) All-Purpose Flour
- 1/2 cup (113g) Unsalted Butter, melted
- 1/2 cup (100g) Granulated Sugar
- 1 cup (200g) Brown Sugar, packed
- 1 teaspoon Cinnamon
- 1/2 teaspoon Salt
- 21 oz (600g) can Apple Pie Filling
- 12–14 oz (350-400g) Caramel Sauce
Instructions
- Preheat oven to 350°F (175°C). Line a 9×13 inch baking pan with parchment paper, leaving an overhang on the long sides, and grease lightly.
- In a large mixing bowl, combine oats, flour, granulated sugar, and salt. Pour in melted butter and mix until the texture resembles wet sand.
- Press the oat mixture firmly and evenly into the bottom of the prepared pan to form the crust.
- Bake the crust for 10 minutes until set. Remove from oven but leave it on the counter.
- Spread the canned apple pie filling evenly over the hot crust.
- Drizzle or spread the caramel sauce over the apples, swirling it gently with a knife or spatula to create pockets of flavor.
- In a separate bowl, mix brown sugar, cinnamon, and any remaining dry ingredients. Dot this streusel mixture over the caramel layer.
- Return to the oven and bake for 20-25 minutes, or until the top is golden brown and caramel is bubbling.
- Let the bars cool completely in the pan (at least 2 hours or refrigerate for 1 hour) to ensure clean cuts.
Notes
Do not use instant or steel-cut oats; old-fashioned rolled oats provide the correct texture. Par-baking the crust prevents a soggy bottom. Chill bars completely before cutting to prevent the caramel from smearing. For a gluten-free version, use certified gluten-free oats and flour.
- Prep Time: 15 minutes
- Cook Time: 30 minutes
- Category: Dessert
- Cuisine: American
Nutrition
- Serving Size: 1 bar
- Calories: 280
- Sugar: 28
- Sodium: 150
- Fat: 12
- Saturated Fat: 7
- Carbohydrates: 42
- Fiber: 2
- Protein: 3
Keywords: fall dessert, caramel apple bars, oat crumble, easy baking, pantry recipe, apple pie filling, quick dessert


