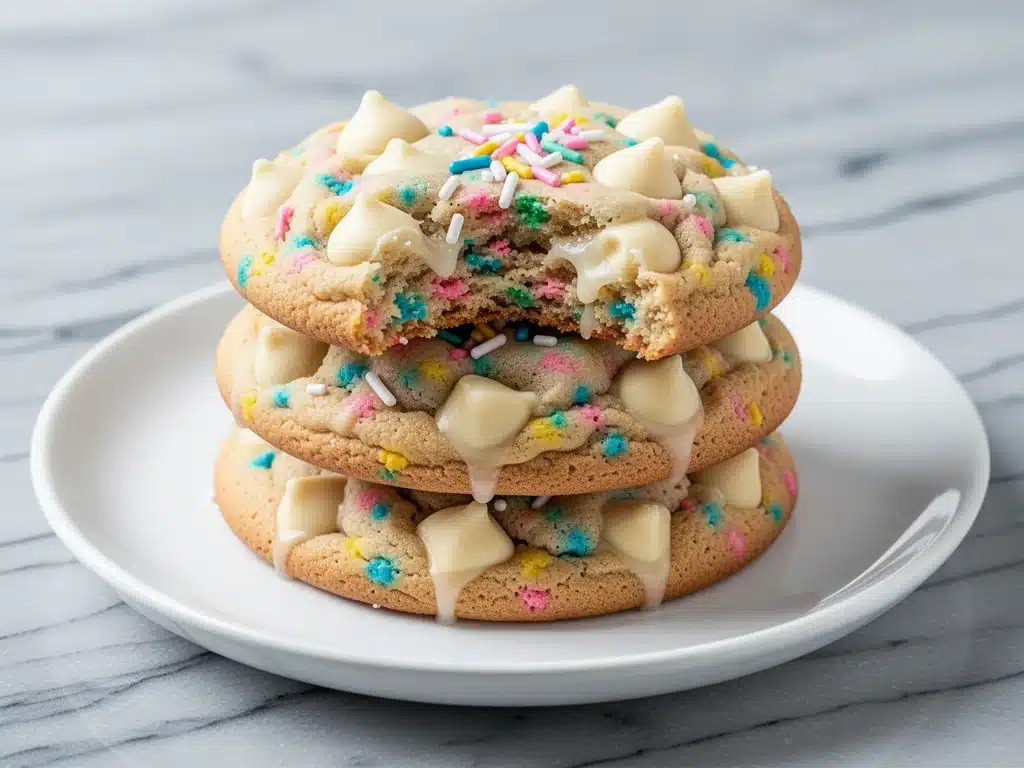
I’ve had this exact moment happen three times this month. I’ll be at a random gathering—maybe a neighbor’s BBQ or a quick coffee date with a friend—and someone will corner me with a half-eaten cookie in hand, eyes wide, asking, “What are these? They’re insane.” It’s always the same question. And every time, I try to keep a straight face while internally screaming because I know they’re about to ask for the recipe, and I’m usually too tired to explain the science of butter temperature.
But here’s the thing: these ultra-chewy funfetti cookies with white chocolate chunks aren’t just a fluke. They’re the result of years of tweaking, burning cookies, and realizing that most “funfetti” recipes are actually just cakey sugar cookies with sprinkles thrown in. That’s not what we want. We want the kind of cookie that holds its shape, has a crisp edge that shatters slightly, and a center that’s soft, chewy, and loaded with melty white chocolate.
I developed this recipe specifically because I was tired of dry, crumbly cookies that fell apart the second you tried to put them in a container. I wanted something that stayed fresh for days (if my kids let them). I wanted the nostalgia of a classic birthday treat, but elevated with real, high-quality ingredients. And I wanted it to be easy enough to throw together on a Tuesday night when I need a win in the kitchen.
So, if you’re looking for a cookie that strikes the perfect balance between sweet and rich, with that pop of color and flavor from sprinkles and the creamy tang of white chocolate, you’ve found it. This is the recipe I keep coming back to. It’s reliable, it’s delicious, and it’s genuinely the best funfetti cookie I’ve ever made. Let’s get baking.
Why You’ll Love This Ultra-Chewy Funfetti Cookie Recipe
There are about ten reasons I keep making this batch after batch, but here are the big ones that keep me coming back to the mixer:
Actually Chewy, Not Cakey — Most funfetti cookies are too light. They’re airy and dry. I’ve tested dozens of ratios, and this one uses a higher proportion of brown sugar to white sugar, plus an extra egg yolk. The result? A cookie that’s dense, chewy, and satisfying. It has that perfect resistance when you bite into it, not a crumbly mess.
Real White Chocolate Chunks — I’m picky about chocolate. The pre-chipped stuff often has a waxy texture and doesn’t melt right. I use high-quality white chocolate bars chopped by hand. It creates pools of creamy, rich chocolate in every bite that feel indulgent, not artificial. It’s a game-changer compared to standard chips.
Colorful and Festive (Without Being Artificial) — We use a mix of rainbow jimmies and nonpareils. The jimmies hold their shape better during baking, so you don’t end up with a muddy, gray cookie. It looks like a party on a plate. These are perfect for birthdays, holidays, or just because it’s a Tuesday and you need some joy.
One-Bowl Simplicity — You don’t need a stand mixer. I’ve made this by hand with a wooden spoon, and it works perfectly. It’s a dump-and-stir kind of recipe. Cream the butter and sugars, add the eggs and vanilla, dump in the dry ingredients, fold in the mix-ins. Done. No fancy equipment required.
Freezes Like a Dream — I love making a double batch and freezing the dough. When I’m having a bad day or need a last-minute treat, I just pull out a few balls of dough and bake them. They taste just as good fresh as they do frozen. It’s my secret weapon for unexpected guests or when I need comfort food fast.
This is my go-to when I want to impress without stressing. No complicated techniques, no weird ingredients, just reliable, delicious food that makes everyone happy. It’s the kind of cookie that disappears before you can even take a photo.
Ingredients You’ll Need
Here’s the best part: you probably have most of this already in your pantry. I’m particular about a few things here, and I’ll tell you exactly why.
Unsalted Butter (1 cup / 226g, softened) — This is the foundation. Use real butter, not margarine. Soften it correctly—it should be cool to the touch but yield to gentle pressure. If it’s melted, your cookies will spread too thin. If it’s too hard, they’ll be dense. Room temperature is key.
Brown Sugar (1 cup / 200g, packed) — Dark or light works, but I prefer dark for that deeper molasses flavor and extra chew. This is what gives the cookie its moisture and chewiness. Don’t skimp on this.
Granulated White Sugar (½ cup / 100g) — This helps with the crisp edges. The ratio of brown to white sugar is what creates that perfect chewy center with a slightly crisp edge.
Large Eggs (2 large, room temperature) — Room temperature eggs emulsify better with the butter and sugar, creating a smoother dough. Cold eggs can cause the butter to seize up a bit, leading to a denser texture.
Egg Yolk (1 extra large yolk) — This is the secret weapon. Adding an extra yolk adds fat and richness, contributing to that ultra-chewy texture. It makes the cookie more tender and less cake-like.
Vanilla Extract (2 teaspoons) — Use real vanilla, not imitation. The flavor is stronger and more complex. It balances the sweetness of the sugar and chocolate beautifully.
All-Purpose Flour (2 ¼ cups / 280g) — Spoon and level your flour. Don’t scoop it directly from the bag, or you’ll pack it down and end up with dry cookies. I use King Arthur Flour, but any good AP flour works.
Baking Soda (1 teaspoon) — This helps the cookies spread and brown. Make sure it’s fresh; old baking soda won’t work well.
Salt (½ teaspoon) — Essential for balancing the sweetness. Don’t skip it.
White Chocolate Chunks (1 ½ cups / 250g, chopped) — As mentioned, use real chocolate bars. Chop them into irregular pieces. This ensures you get chunks in every bite, not just tiny chips.
Rainbow Sprinkles (½ cup total) — I use a mix of jimmies (for structure) and nonpareils (for color pop). Add them gently at the end so they don’t bleed into the dough.
Flaky Sea Salt (Optional but Recommended) — A sprinkle on top after baking elevates the flavor profile, adding a salty contrast to the sweet chocolate and sugar.
Equipment Needed
You don’t need fancy equipment for this. Here’s what I actually use:
Large Mixing Bowl — I use a 5-quart bowl. It needs to be big enough to fold in the chocolate and sprinkles without making a mess.
Hand Mixer or Wooden Spoon — A hand mixer makes creaming the butter and sugar faster (about 2-3 minutes), but a wooden spoon works fine if you’re willing to put in some arm work.
Rubber Spatula — Essential for scraping down the sides of the bowl and folding in the mix-ins gently. I use a sturdy silicone spatula.
Baking Sheets — I use standard half-sheet pans. Dark pans cook faster, so I might reduce the oven temp by 25 degrees if I’m using them. Lighter pans are more forgiving.
Parchment Paper — Line your baking sheets. This prevents sticking and makes cleanup a breeze. It also helps with even baking.
Cooling Rack — Let the cookies cool on the sheet for 5 minutes, then transfer to a rack. This stops the cooking process and prevents the bottoms from getting soggy.
Ice Cream Scoop or Cookie Scoop — This ensures uniform size, so they all bake evenly. I use a 2-tablespoon scoop. It’s worth the investment for consistency.
Whisk — For mixing the dry ingredients together. It aerates the flour and ensures the baking soda and salt are evenly distributed.
Measuring Cups and Spoons — Be precise with the dry ingredients. Baking is chemistry, after all.
How to Make It: Step-by-Step
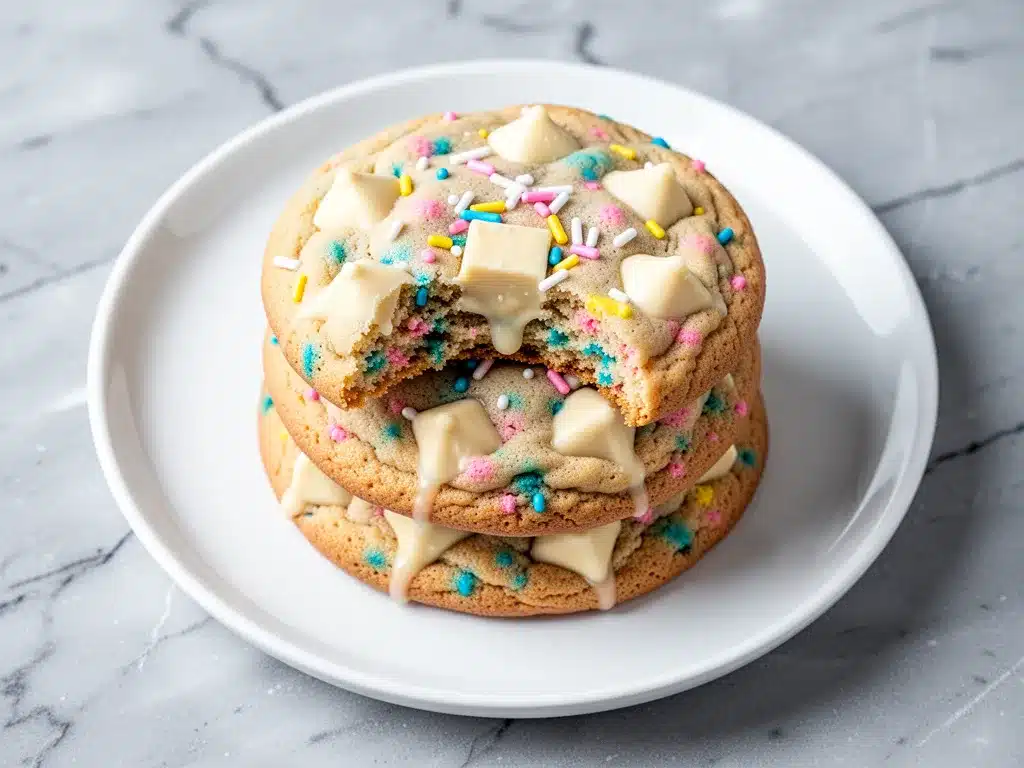
Alright, let’s make this! I’m walking you through exactly how I do it, including the little tricks I’ve picked up over the years.
Step 1: Prep Your Oven and Pans (5 minutes)
Preheat your oven to 350°F (175°C). Line two large baking sheets with parchment paper. This is crucial for even baking and easy cleanup. If you don’t have parchment, you can use silicone mats, but parchment is my go-to.
Step 2: Cream the Butter and Sugars (3-4 minutes)
In a large mixing bowl, combine the softened unsalted butter, packed brown sugar, and granulated white sugar. Using a hand mixer on medium-high speed (or a sturdy wooden spoon), beat until the mixture is light, fluffy, and pale in color. This usually takes about 3 minutes. This step incorporates air into the dough, which helps with the texture. Don’t rush this step.
Step 3: Add Eggs and Vanilla (2 minutes)
Add the two large eggs, the extra egg yolk, and the vanilla extract. Beat on medium speed until fully combined and smooth. Scrape down the sides of the bowl with a spatula to ensure everything is incorporated. The mixture should look creamy and uniform.
Step 4: Mix Dry Ingredients (1 minute)
In a separate medium bowl, whisk together the all-purpose flour, baking soda, and salt. This ensures the leavening agent is evenly distributed, so you don’t get bitter spots of baking soda in your cookies.
Step 5: Combine Wet and Dry (2 minutes)
Gradually add the dry ingredients to the wet ingredients, mixing on low speed (or folding by hand) until just combined. Be careful not to overmix. Once the flour disappears, stop mixing. Overmixing develops gluten, which leads to tough cookies.
Step 6: Fold in Mix-ins (2 minutes)
Using your rubber spatula, gently fold in the chopped white chocolate chunks and rainbow sprinkles. Fold until they are evenly distributed. Be gentle to avoid breaking the chocolate chunks too much or bleeding the sprinkles.
Step 7: Scoop and Chill (Optional but Recommended) (10 minutes)
Scoop the dough into balls (about 2 tablespoons each) and place them on the prepared baking sheets, spacing them about 2 inches apart. For thicker, chewier cookies, I recommend chilling the dough balls for at least 30 minutes (or up to 24 hours). This solidifies the butter, preventing the cookies from spreading too thin in the oven. If you’re in a hurry, you can bake them right away, but they’ll be thinner.
Step 8: Bake (10-12 minutes)
Bake the cookies in the preheated oven for 10-12 minutes, or until the edges are lightly golden and the centers are still soft and slightly puffed. They will continue to cook on the hot baking sheet after you remove them from the oven. Don’t overbake them! They should look slightly underdone in the center.
Step 9: Cool and Serve (5 minutes)
Let the cookies cool on the baking sheet for 5 minutes. Then, transfer them to a wire rack to cool completely. If you’re using flaky sea salt, sprinkle a tiny pinch on top while they’re still warm. Enjoy warm for the best texture, or store for later.
Expert Tips & Tricks
Here’s everything I’ve learned from making this dozens of times. These tips will save you from my mistakes.
Chill Your Dough
This is the #1 tip for chewy cookies. Chilling the dough allows the flour to hydrate fully and the butter to firm up. This results in a cookie that spreads less and has a deeper, more complex flavor. I usually chill my dough overnight, but even 30 minutes makes a difference.
Don’t Overbake
Take them out when they look slightly underdone. The residual heat will finish cooking them as they cool. If you bake them until they look firm in the oven, they’ll be dry and crumbly once cooled. I prefer them soft and chewy.
Use Real Chocolate
Chop your own white chocolate bars. The irregular chunks melt differently than uniform chips, creating pockets of gooey chocolate. It’s worth the extra 5 minutes of chopping.
Spoon and Level Flour
Don’t scoop flour directly from the bag. Spoon it into the measuring cup and level it off with a knife. This prevents packing too much flour, which leads to dry, dense cookies.
Room Temperature Ingredients
Make sure your butter and eggs are at room temperature. This ensures they emulsify properly, creating a smooth, uniform dough. Cold ingredients can lead to a lumpy, uneven dough.
Common Mistakes (and how to avoid them):
Mistake: Cookies spread too thin. Fix: Your butter was too soft or melted. Chill the dough before baking. Also, check your oven temperature with a thermometer; it might be running hot.
Mistake: Cookies are dry. Fix: You overbaked them or used too much flour. Check your flour measuring technique and reduce baking time by 1-2 minutes.
Mistake: Sprinkles bled into the dough. Fix: You used the wrong type of sprinkles. Use jimmies or nonpareils, not rainbow sanding sugar or sprinkles with a wax coating.
Variations & Substitutions
Once you’ve nailed the basic version, here’s how you can mix it up. I’ve tried all of these.
Chocolate Chip Funfetti
Add ½ cup semi-sweet chocolate chips along with the white chocolate chunks. This adds a nice contrast of flavors and colors.
Red Velvet Funfetti
Add 1 tablespoon of cocoa powder and 1 teaspoon of red food coloring to the wet ingredients. This creates a beautiful red dough with white chocolate chunks.
Matcha White Chocolate
Swap 2 tablespoons of flour for high-quality matcha powder. This adds a subtle earthy flavor that pairs beautifully with white chocolate. It’s a sophisticated twist.
Lemon Zest
Add the zest of one lemon to the wet ingredients. This adds a bright, citrusy note that cuts through the sweetness. Great for spring.
Gluten-Free
Use a 1:1 gluten-free flour blend. Make sure it contains xanthan gum, or add ½ teaspoon. The texture will be slightly different but still delicious.
Dairy-Free
Use dairy-free butter and dairy-free white chocolate chips. The texture will be similar, but the flavor might be slightly less rich.
Serving & Storage
How to Serve:
I usually serve these warm, right out of the oven. They’re best enjoyed with a cold glass of milk. But here are other ways I’ve enjoyed them:
- Cookie Sandwiches: Sandwich two cookies together with a layer of peanut butter or cream cheese frosting.
- Ice Cream Topping: Crumble them over vanilla ice cream for a funfetti sundae.
- Party Platter: Arrange them on a platter with other cookies for a dessert table.
Storage Instructions:
Room Temperature: Store in an airtight container at room temperature for up to 5 days. Place a slice of bread in the container to keep them soft.
Refrigerator: Not recommended, as the fridge can dry out baked goods.
Freezer: You can freeze baked cookies for up to 3 months. Thaw at room temperature. Or, freeze the dough balls on a baking sheet, then transfer to a freezer bag. Bake from frozen, adding 1-2 minutes to the baking time.
Pro Tip: If your cookies start to lose their chewiness, microwave them for 10-15 seconds to soften them up again.
Nutrition Information
I’m not a nutritionist, but here’s the breakdown if you’re tracking. These are approximate values per cookie (makes about 24 cookies).
| Per Cookie | Amount |
|---|---|
| Calories | 180 |
| Protein | 2g |
| Carbs | 24g |
| Fat | 9g |
| Sugar | 16g |
| Sodium | 120mg |
Look, these are cookies. They’re meant to be indulgent. But they’re not overly sweet, and the white chocolate adds a nice creamy element. When I make these, I usually limit myself to two or three, but I understand if you want more.
Final Thoughts
So that’s my go-to ultra-chewy funfetti cookie recipe! I’ve probably talked your ear off at this point, but when you make a recipe this often, you have a lot to say about it. These cookies have saved me on more than one occasion. They’re my answer to “what’s for dessert?” when I need something quick, delicious, and universally loved.
My kids are obsessed, my friends beg me for the recipe, and I’m happy because they’re so easy to make. They’re the perfect balance of nostalgia and quality. Make them yours! Try different types of sprinkles, swap the white chocolate for dark, or add a pinch of sea salt. The best recipes are the ones you adapt to your tastes.
If you make this, drop a comment and let me know what you think! I love hearing how recipes turn out in your kitchen. And if something doesn’t work, tell me that too—I’m here to help troubleshoot. Happy baking!
Frequently Asked Questions
Can I use pre-chipped white chocolate?
You can, but I strongly recommend chopping your own bars. Pre-chipped chocolate often contains stabilizers that prevent it from melting smoothly, resulting in a waxy texture. Chopping your own chocolate ensures you get those beautiful, gooey pools of white chocolate in every bite. It’s worth the extra few minutes.
Why did my cookies spread too much?
This usually happens for one of three reasons: 1) Your butter was too soft or melted before creaming. 2) You didn’t chill the dough. 3) Your oven temperature is too high. Make sure your butter is cool to the touch, chill the dough for at least 30 minutes, and consider using an oven thermometer to verify the temperature.
Can I freeze the cookie dough?
Absolutely! This is one of my favorite meal prep tricks. Scoop the dough into balls, place them on a baking sheet, and freeze until solid. Then transfer to a freezer bag. They’ll keep for up to 3 months. Bake from frozen, adding 1-2 minutes to the baking time. It’s so convenient!
Can I use brown butter?
Yes! Brown butter adds a nutty, rich flavor that pairs beautifully with white chocolate. Just let the brown butter cool completely to room temperature before using it in the recipe. If it’s warm, it will melt the sugar and change the texture. You can also check out my brown butter chocolate chip cookies for more tips on working with brown butter.
What kind of sprinkles work best?
I recommend using “jimmies” or “nonpareils.” Avoid “sanding sugar” or sprinkles with a wax coating, as these can bleed color into the dough or not hold up to baking. Jimmies are my favorite because they’re sturdy and hold their shape well. You can find them in most grocery stores or online.
Can I make these gluten-free?
Yes! Use a 1:1 gluten-free flour blend that includes xanthan gum. If your blend doesn’t have xanthan gum, add ½ teaspoon. The texture will be slightly different but still delicious. I’ve tested this with several brands, and they all work well.
Pin This Recipe!

Ultra-Chewy Funfetti Cookies: Easy Homemade Recipe
- Total Time: 25 minutes
- Yield: 24 cookies 1x
Description
These ultra-chewy funfetti cookies feature crisp edges, a soft chewy center, and melty white chocolate chunks. Made with a high brown sugar ratio and an extra egg yolk for texture, this one-bowl recipe is easy to make and freezes well.
Ingredients
- 1 cup (226g) unsalted butter, softened
- 1 cup (200g) packed brown sugar (dark or light)
- 1/2 cup (100g) granulated white sugar
- 2 large eggs, room temperature
- 1 extra large egg yolk
- 2 teaspoons vanilla extract
- 2 1/4 cups (280g) all-purpose flour, spooned and leveled
- 1 teaspoon baking soda
- 1/2 teaspoon salt
- 1 1/2 cups (250g) white chocolate chunks, chopped
- 1/2 cup rainbow sprinkles (mix of jimmies and nonpareils)
- Flaky sea salt, optional for topping
Instructions
- Preheat oven to 350°F (175°C). Line two large baking sheets with parchment paper.
- In a large mixing bowl, cream the softened butter, brown sugar, and granulated sugar together until light, fluffy, and pale in color (about 3 minutes).
- Add the eggs, extra egg yolk, and vanilla extract. Beat on medium speed until fully combined and smooth. Scrape down the sides of the bowl.
- In a separate medium bowl, whisk together the flour, baking soda, and salt.
- Gradually add the dry ingredients to the wet ingredients, mixing on low speed or folding by hand until just combined. Do not overmix.
- Gently fold in the chopped white chocolate chunks and rainbow sprinkles until evenly distributed.
- Scoop dough into 2-tablespoon balls and place on prepared baking sheets, spacing them 2 inches apart. For thicker cookies, chill dough for at least 30 minutes.
- Bake for 10-12 minutes, or until edges are lightly golden and centers are still soft. Do not overbake.
- Let cookies cool on the baking sheet for 5 minutes, then transfer to a wire rack to cool completely. Sprinkle with flaky sea salt if desired.
Notes
Chilling the dough is recommended for thicker, chewier cookies. Use real white chocolate bars chopped by hand for best texture. Spoon and level flour to avoid dry cookies. Store in an airtight container with a slice of bread to maintain softness.
- Prep Time: 15 minutes
- Cook Time: 10-12 minutes
- Category: Dessert
- Cuisine: American
Nutrition
- Serving Size: 1 cookie
- Calories: 180
- Sugar: 16
- Sodium: 120
- Fat: 9
- Saturated Fat: 5
- Carbohydrates: 24
- Fiber: 1
- Protein: 2
Keywords: funfetti cookies, chewy cookies, white chocolate cookies, homemade cookies, easy baking, birthday cookies, one-bowl recipe


