
It was 11 PM on a Tuesday, and I was standing in my kitchen staring at a stick of butter that was actively smoking. I wasn’t trying to be dramatic. I was just trying to make cookies. Again. This was my fourth attempt at a “fudgy” chocolate chip cookie that week, and my third batch was currently cooling on a wire rack, tasting like burnt toast and disappointment. My husband walked in, sniffed the air, frowned, and asked if the house was on fire. I told him no, it was just my ego taking a hit.
But here’s the thing about baking failures: they’re usually just lessons in disguise. I realized I’d been browning my butter too fast, scorching the milk solids instead of toasting them to that beautiful, nutty golden brown. I scraped out the pan, wiped it clean, and started over. This time, I paid attention. I watched the color. I smelled the aroma (nutty, like hazelnuts and warm bread). I pulled it off the heat the second it turned amber. And when I mixed that brown butter into my dough, something magical happened. The cookies didn’t just bake; they transformed.
These aren’t your average soft chocolate chip cookies. They’re dense, chewy, and deeply caramelized. The brown butter adds a complexity that regular butter just can’t touch, and the flaky sea salt on top? It’s the kind of finish that makes people stop mid-chew and ask, “What is in these?” I’ve made this batch of fudgy brown butter chocolate chip cookies with flaky sea salt at least a dozen times since that late-night kitchen experiment. My family has requested them more than any other dessert, beating out even my soft glazed cinnamon rolls during holiday season. If you’re tired of flat, cakey cookies and want something with serious depth and a chewy center, this is the recipe you’ve been looking for.
Why You’ll Love This Recipe
There are about ten reasons I keep making these cookies, but here are the big ones that keep me coming back to this dough every single week.
It’s Not Just “Chewy”—It’s Fudgy — I’ve tested dozens of cookie recipes, and most claim to be chewy but end up crisp or cakey. This one is genuinely fudgy. The center stays soft and almost brownie-like for days, while the edges crisp up just enough to give you that perfect texture contrast. I love the way it holds together without falling apart.
Brown Butter Changes Everything — I know, I know, browning butter sounds like extra work. But it’s only ten minutes of standing there watching the butter. The result is a deep, nutty, toasty flavor that makes the chocolate taste richer and more intense. It’s the difference between a casual snack and a gourmet treat. It’s basically the guanciale of the baking world—simple ingredients, but the technique elevates the whole dish.
Flaky Sea Salt is Non-Negotiable — Sweet and salty is a classic combo, but using flaky sea salt *after* baking is where the magic happens. Those crunchy flakes on top of the soft cookie? It’s addictive. I find myself picking off the salt crystals one by one. It cuts through the sweetness and makes the chocolate pop.
They Stay Fresh Forever — Most cookies are dry by day three. These stay moist and fudgy for up to five days if stored in an airtight container. I actually prefer them on day two, when the flavors have had time to meld and the brown butter flavor really shines through.
Perfect for Gift-Giving — Because they look fancy (thanks to that salt) and taste incredible, these are my go-to holiday gifts. I bake them in batches, box them up, and hand them out to neighbors. They always get compliments. Way better than store-bought cookies, obviously.
This is my go-to when I need a dessert that feels special but doesn’t require hours of effort. No complicated techniques, no weird ingredients, just reliable, delicious food that makes everyone happy.
Ingredients You’ll Need
Here’s the best part: you probably have most of this already. The beauty of this recipe is how few ingredients it takes, but how high-quality they need to be. Since there’s no vanilla extract overload or excessive flour to hide behind, every ingredient matters.
Unsalted Butter (1 cup / 226g) — This is the star. You need high-quality, European-style butter if you can find it (like Kerrygold or Plugrá). It has a higher fat content, which makes the brown butter richer. Don’t use margarine or light butter. Full fat only.
Brown Sugar (1 ½ cups / 300g) — Packed tight. Brown sugar is what gives these cookies their chewiness and moisture. Light brown sugar works, but dark brown sugar adds a deeper molasses flavor that pairs beautifully with the brown butter. I always keep a bag of dark brown sugar stocked just for this.
Granulated Sugar (½ cup / 100g) — Just a little bit. This helps with the crisp edges. Too much sugar and the cookies spread too thin. I measure this carefully because I’ve had cookies that spread into one giant cookie sheet before.
Large Eggs (2 large) — Room temperature is best. Cold eggs can seize the butter when you mix them in. If you forget to take them out, just crack them into a bowl and microwave for 10 seconds. Don’t cook them, just warm them up.
Egg Yolk (1 large yolk) — This is the secret weapon for fudginess. The extra yolk adds fat and emulsification, making the cookie denser and chewier. I usually save the white for my homemade brioche or just scramble it for breakfast.
Vanilla Extract (2 teaspoons) — Use real vanilla, not imitation. The flavor will be noticeable. I love using a high-quality bourbon vanilla for extra depth.
All-Purpose Flour (2 ¼ cups / 280g) — Spoon and level method. Don’t scoop directly from the bag, or you’ll pack in too much flour and get dry cookies. Spoon it into the cup and level it off with a knife. I use Gold Medal flour, but any brand works.
Baking Soda (1 teaspoon) — Fresh! If your baking soda is older than six months, it might not leaven properly. Test it by dropping a little in vinegar—if it doesn’t fizz, throw it out.
Salt (1 teaspoon) — Fine table salt or kosher salt for the dough. This balances the sweetness. Don’t skip it, even if you’re adding sea salt on top.
Chocolate Chips (2 cups / 340g) — I use a mix. 1 cup semi-sweet chocolate chips and 1 cup chopped chocolate bar (like Ghirardelli 60% cacao). Chopping the bar creates those beautiful, irregular pools of chocolate that make the cookies look professional.
Flaky Sea Salt (for topping) — Maldon is the gold standard, but any flaky sea salt works. This is for sprinkling on top immediately after baking.
Equipment Needed
You don’t need fancy equipment for this. Here’s what I actually use.
Large Saucepan — For browning the butter. A light-colored pan is best so you can see the color change clearly. I use a stainless steel saucepan. Dark pans hide the color, and you might burn the butter without realizing it.
Mixing Bowls — One large bowl for the wet ingredients, one medium for the dry. I have a set of glass bowls that nest together. Nice and stable.
Wooden Spoon or Silicone Spatula — For mixing the dough. A sturdy spatula is great for scraping the sides. I prefer silicone because it doesn’t scratch my bowls.
Measuring Cups and Spoons — For dry ingredients, use measuring cups. For wet ingredients, I often use a liquid measuring cup for speed. But for accuracy, especially with flour, dry cups are best.
Baking Sheets — I use half-sheet pans (18×13 inches). Light-colored aluminum pans are best because they conduct heat evenly. Dark pans can cause the bottoms to burn. Line them with parchment paper. Always.
Parchment Paper — Non-negotiable. It prevents sticking and makes cleanup a breeze. I never bake cookies directly on the pan anymore. Ask me how I know. (I once tried it. It was a sticky mess.)
Cooling Rack — To cool the cookies so they don’t continue cooking on the hot pan. A wire rack is standard and works perfectly.
Whisk — For aerating the butter and sugars. A simple wire whisk is fine. I use one from IKEA that I’ve had for years. It’s cheap and does the job.
How to Make It: Step-by-Step

Alright, let’s make this! I’m walking you through exactly how I do it, including the little tricks I’ve picked up over dozens of batches.
Step 1: Brown the Butter (10 minutes)
Start by melting the butter in a saucepan over medium heat. Stir it constantly. It will foam up, then settle. Watch it closely. The foam will start to subside, and you’ll see little brown specks forming at the bottom. This is the milk solids toasting. Once the butter turns a deep amber color and smells nutty (like hazelnuts or toasted bread), remove it from the heat immediately. Pour it into a heat-proof bowl to stop the cooking. Let it cool for 10-15 minutes until it’s still liquid but not hot. If it’s too hot, it will cook the eggs when you add them.
Step 2: Mix the Wet Ingredients (3 minutes)
In a large bowl, whisk the cooled brown butter with the brown sugar and granulated sugar until well combined. The mixture should look glossy and smooth. Add the eggs, egg yolk, and vanilla extract. Whisk vigorously for about 1-2 minutes. This step incorporates air and helps create that chewy texture. The mixture should look slightly thickened and pale. Don’t skip the whisking!
Step 3: Combine Dry Ingredients (2 minutes)
In a separate medium bowl, whisk together the flour, baking soda, and salt. Make sure there are no clumps of baking soda. This ensures even distribution.
Step 4: Make the Dough (2 minutes)
Add the dry ingredients to the wet ingredients. Use a wooden spoon or spatula to fold them together. Mix just until no streaks of flour remain. Overmixing develops gluten, which makes cookies tough. You want them tender and fudgy, so stop as soon as the dough comes together. Fold in the chocolate chips. I like to save a handful to press on top of the cookies before baking for that bakery look.
Step 5: Chill the Dough (30 minutes to 24 hours)
This is the step most people skip, but I promise, don’t skip it. Chilling the dough allows the flour to hydrate and the flavors to meld. It also prevents the cookies from spreading too thin. If you’re in a hurry, chill for 30 minutes. If you can plan ahead, chill for 24 hours. The flavor deepens significantly after a day in the fridge. I often make the dough on Sunday for cookies on Tuesday. It’s a game-changer.
Step 6: Scoop and Bake (12-14 minutes)
Preheat your oven to 350°F (175°C). Line baking sheets with parchment paper. Scoop the dough into balls, about 2 tablespoons each. I use a small cookie scoop for uniformity, but a spoon works too. Place them on the baking sheet, spacing them at least 2 inches apart—they will spread. Bake for 12-14 minutes. The edges should be golden brown and set, but the centers should still look slightly soft and underbaked. They will firm up as they cool. This is key for the fudgy center.
Step 7: Salt and Cool (5 minutes)
Immediately upon removing the cookies from the oven, sprinkle each one with flaky sea salt. The residual heat will help the salt adhere. Let the cookies cool on the baking sheet for 5 minutes. Then transfer them to a wire rack to cool completely. They’ll crisp up slightly as they cool, but stay soft in the middle.
Total Time: About 45 minutes active, plus chilling time. The actual baking is hands-off, so you can multitask.
Expert Tips & Tricks
Here’s everything I’ve learned from making this dozens of times. These tips will save you from my mistakes.
Don’t Overbake — This is the #1 mistake. People see soft centers and think “undercooked,” so they bake them longer. Don’t. The cookies continue to cook on the hot pan after you take them out. Pull them when the edges are set but the middle still jiggles slightly. They will be fudgy, not raw.
Chill Longer for Better Flavor — I know waiting is hard, but 24 hours of chilling is worth it. The brown sugar caramelizes more, and the flour fully hydrates, leading to a deeper, richer flavor. I’ve compared cookies baked immediately vs. chilled for 24 hours, and the difference is night and day.
Use a Scale — If you have a kitchen scale, use it. Baking is chemistry, and weight is more accurate than volume. 280g of flour is always 280g of flour, regardless of how humid it is in your kitchen. If you don’t have a scale, stick to the spoon-and-level method.
Room Temperature Eggs — Cold eggs can cause the brown butter to seize up when you mix them in. If your eggs are cold, warm them in a bowl of warm water for 5 minutes before cracking them. It takes seconds and prevents a lumpy dough.
Chocolate Quality Matters — Since there’s not much else going on, the chocolate is a major flavor component. Use good chocolate chips or, even better, chop up a chocolate bar. It creates irregular chunks that melt into pockets of goo. I love using Ghirardelli or Guittard.
Salt on Top is Essential — Don’t just mix salt into the dough. The flaky sea salt on top provides a textural contrast and bursts of salty flavor that cut through the sweetness. It’s not just garnish; it’s a critical component.
Variations & Substitutions
Once you’ve nailed the basic version, here’s how you can mix it up. I’ve tried all of these.
White Chocolate Macadamia — Swap the chocolate chips for white chocolate chips and add 1 cup of toasted macadamia nuts. It’s like a fancy beach cookie. My kids love this version.
Peanut Butter Chip — Use peanut butter chips instead of chocolate. The salty, nutty flavor pairs incredibly well with the brown butter. Add a drizzle of peanut butter on top after baking for extra indulgence.
Oatmeal Raisin — Add 1 cup of rolled oats and ½ cup of raisins. It adds chewiness and texture. I sometimes add a pinch of cinnamon for warmth. It’s a great way to use up old oats.
Double Chocolate — Add ¼ cup of cocoa powder to the dry ingredients. It makes the cookies darker and more intense. Use dark chocolate chips for maximum chocolate flavor. It’s like a brownie cookie.
Gluten-Free — Use a 1:1 gluten-free flour blend (like Bob’s Red Mill). Add ½ teaspoon of xanthan gum if the blend doesn’t include it. The texture might be slightly more crumbly, but they still taste great.
Dairy-Free — Use a high-quality dairy-free butter stick (not tub margarine). Use dairy-free chocolate chips. The flavor will be slightly different, but still delicious.
Lower Sugar — Reduce the granulated sugar by ¼ cup. You’ll lose some crispness, but the cookies will still be sweet. I don’t recommend reducing brown sugar, as it affects the texture.
Serving & Storage
How to Serve: I usually serve these warm, right off the baking sheet. They’re best enjoyed with a cold glass of milk or a cup of coffee. I also like to serve them with a dollop of whipped cream or a scoop of vanilla ice cream for a decadent dessert. For a fancy touch, pair them with a pomegranate honey cheesecake for a holiday spread.
Side Dishes: These cookies are a dessert on their own, but if you’re serving a full meal, they pair well with a light fruit salad or a simple green salad to balance the richness.
Storage Instructions:
Room Temperature: Store in an airtight container at room temperature for up to 5 days. Place a slice of bread in the container to keep them soft. The bread will become hard, but the cookies will stay moist.
Refrigerator: Not recommended. The fridge dries out cookies. Only refrigerate if your kitchen is extremely hot and humid.
Freezing: You can freeze the dough balls! Scoop them onto a baking sheet, freeze until solid, then transfer to a freezer bag. Bake from frozen, adding 1-2 minutes to the baking time. Or, freeze baked cookies in an airtight container for up to 3 months. Thaw at room temperature.
Pro tip: If your cookies seem dry after a few days, microwave them for 10-15 seconds. They’ll be soft and fudgy again instantly.
Nutrition Information
I’m not a nutritionist, but here’s the breakdown if you’re tracking. Keep in mind that these are rich, indulgent cookies, so portions matter.
Per Cookie (makes approx. 24 cookies):
- Calories: 180
- Protein: 3g
- Carbs: 24g
- Fiber: 1g
- Sugar: 16g
- Fat: 9g
- Saturated Fat: 5g
- Cholesterol: 35mg
- Sodium: 120mg
What’s Good:
- Contains some protein from the eggs and butter.
- Chocolate offers antioxidants.
- More filling than it looks due to the density.
What to Know:
- Higher in calories and fat due to butter and chocolate.
- Contains dairy and gluten.
- High in sugar, as expected for a cookie.
My Take: Look, these are fudgy brown butter chocolate chip cookies. They’re not a health food. They’re a treat. Enjoy them in moderation, and they’ll fit into any balanced diet. I usually have one or two with my morning coffee, and I’m happy. When I want to make it lighter, I stick to one cookie and pair it with a piece of fruit. But usually? I just enjoy the moment.
Final Thoughts
So that’s my go-to fudgy brown butter chocolate chip cookies with flaky sea salt! I’ve probably talked your ear off at this point, but when you make a recipe this often, you have a lot to say about it. These cookies have saved my dessert game more times than I can count. They’re my answer to “what’s for dessert?” when I want something that feels special but doesn’t require hours of effort. My kids are happy, my husband’s happy, and I’m happy because I’m not stressed about baking.
Make it yours! Try different chocolates, add nuts, or play with the salt. The best recipes are the ones you adapt to your family’s tastes. If you make this, drop a comment and let me know what you think! I love hearing how recipes turn out in your kitchen. And if something doesn’t work, tell me that too—I’m here to help troubleshoot.
Happy baking! And I hope your kitchen smells half as good as mine does right now.
Frequently Asked Questions
Can I use salted butter?
You can, but you’ll need to reduce the salt in the dough to ½ teaspoon. Since the recipe calls for 1 teaspoon of salt, adding salted butter would make the cookies too salty. I prefer unsalted butter because it gives you more control over the saltiness, especially since you’re adding flaky sea salt on top.
Why did my cookies spread too much?
This usually happens if the butter was too warm when you mixed it with the sugar, or if you didn’t chill the dough. Brown butter cools quickly, but if you didn’t let it cool completely before adding the sugar, it can cause spreading. Also, make sure you’re using parchment paper. Baking directly on a dark pan can cause excessive spreading and burning.
Can I freeze the dough?
Absolutely! This is one of the best things about this recipe. Scoop the dough into balls, freeze them on a baking sheet until solid, then transfer to a freezer bag. They’ll keep for up to 3 months. Bake from frozen, adding 1-2 minutes to the baking time. It’s perfect for having fresh cookies on demand.
Why did my cookies come out cakey instead of fudgy?
Cakey cookies usually mean too much flour or too much baking soda. Make sure you’re spooning and leveling your flour, not scooping. Also, check your baking soda freshness. If it’s old, it won’t leaven properly, but if you used too much, it can make the cookies rise too much. Stick to the measurements, and don’t overbake. Pull them when the edges are set but the center is still soft.
Can I use dark brown sugar instead of light?
Yes! Dark brown sugar has more molasses, which adds a deeper flavor and more moisture. I actually prefer dark brown sugar for this recipe because it enhances the brown butter flavor. If you only have light brown sugar, it will still work, but the cookies will be slightly less chewy and have a milder flavor.
How do I store leftovers?
Store in an airtight container at room temperature for up to 5 days. If your kitchen is hot, you might need to refrigerate them, but that can dry them out. To keep them soft, add a slice of bread to the container. The cookies will absorb the moisture from the bread, staying soft for days.
Can I make these cookies gluten-free?
Yes! Use a 1:1 gluten-free flour blend. Make sure the blend includes xanthan gum, or add ½ teaspoon yourself. The texture might be slightly more crumbly, but they’ll still taste delicious. I’ve used Bob’s Red Mill and King Arthur Gluten-Free Flour, and both work well.
Pin This Recipe!

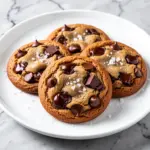
Fudgy Brown Butter Chocolate Chip Cookies
- Total Time: 45 minutes
- Yield: 24 cookies 1x
Description
Dense, chewy, and deeply caramelized cookies made with nutty brown butter and topped with flaky sea salt for a gourmet finish.
Ingredients
- 1 cup (226g) unsalted butter
- 1 ½ cups (300g) packed brown sugar
- ½ cup (100g) granulated sugar
- 2 large eggs, room temperature
- 1 large egg yolk
- 2 teaspoons vanilla extract
- 2 ¼ cups (280g) all-purpose flour
- 1 teaspoon baking soda
- 1 teaspoon salt
- 2 cups (340g) chocolate chips (mix of semi-sweet chips and chopped chocolate bar)
- Flaky sea salt, for topping
Instructions
- Brown the butter: Melt butter in a saucepan over medium heat, stirring constantly until it turns deep amber and smells nutty. Remove from heat and pour into a heat-proof bowl. Cool for 10-15 minutes until liquid but not hot.
- Mix wet ingredients: In a large bowl, whisk the cooled brown butter with brown sugar and granulated sugar until glossy. Add eggs, egg yolk, and vanilla. Whisk vigorously for 1-2 minutes until thickened and pale.
- Combine dry ingredients: In a separate medium bowl, whisk together flour, baking soda, and salt.
- Make the dough: Fold dry ingredients into wet ingredients until no streaks of flour remain. Do not overmix. Fold in chocolate chips.
- Chill the dough: Refrigerate dough for at least 30 minutes or up to 24 hours to hydrate flour and prevent spreading.
- Scoop and bake: Preheat oven to 350°F (175°C). Line baking sheets with parchment paper. Scoop dough into 2-tablespoon balls, spacing 2 inches apart. Bake for 12-14 minutes until edges are golden but centers look soft.
- Salt and cool: Immediately sprinkle cookies with flaky sea salt upon removing from oven. Let cool on the baking sheet for 5 minutes, then transfer to a wire rack to cool completely.
Notes
Chilling the dough for 24 hours significantly deepens the flavor. Use a scale for accuracy with flour. Do not overbake; cookies continue to cook on the hot pan after removal. Store in an airtight container with a slice of bread to maintain softness.
- Prep Time: 30 minutes
- Cook Time: 12-14 minutes
- Category: Dessert
- Cuisine: American
Nutrition
- Serving Size: 1 cookie
- Calories: 180
- Sugar: 16
- Sodium: 120
- Fat: 9
- Saturated Fat: 5
- Carbohydrates: 24
- Fiber: 1
- Protein: 3
Keywords: brown butter cookies, fudgy chocolate chip cookies, flaky sea salt cookies, chewy cookies, homemade cookies, dessert recipe


