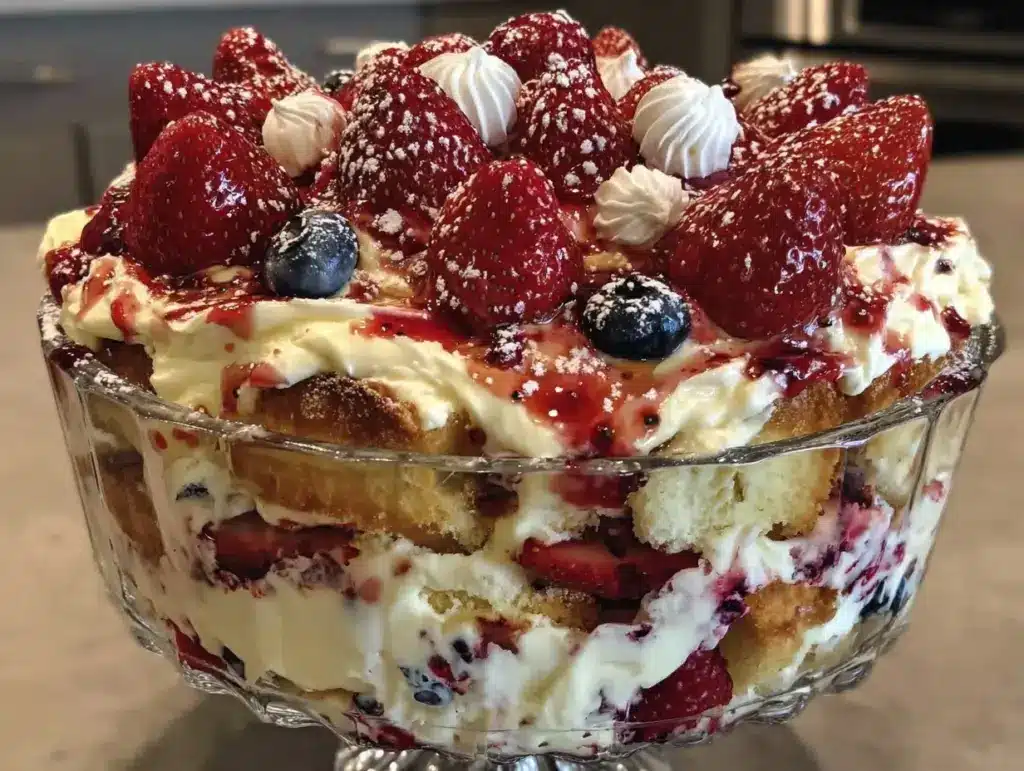
I still remember the first time I made this red, white, and blue berry trifle. It was July, the air was thick enough to chew, and I had just realized I’d forgotten to buy dessert for the Labor Day barbecue I was hosting. Panic? Maybe. But I also had a fridge full of cream cheese, heavy cream, and a mountain of fresh berries that were screaming to be used. I threw them together in a glass bowl, expecting a muddy mess. Instead, I got this towering, gorgeous, Instagram-worthy dessert that made my guests stop mid-chicken-wing to take a photo.
That was five years ago. Since then, this Perfect Berry Trifle has become my secret weapon for every summer gathering. Whether it’s a 4th of July picnic, a wedding shower, or just a lazy Tuesday where I want to feel fancy, this dessert never fails. It’s got that restaurant-quality elegance but requires about five minutes of actual effort. No baking. No complicated piping. Just beautiful layers that look like you spent all day in the kitchen (even though you didn’t).
What I love most is how the colors play off each other. The deep purple of the blueberries, the bright red of the strawberries and raspberries, and the snowy white of the cream create this patriotic vibe without feeling cheesy or over-the-top. It’s fresh, it’s light enough to eat after a heavy meal, and it’s ridiculously easy to scale up for a crowd or down for a cozy night in. If you’re looking for a dessert that impresses without stressing you out, this is it.
Why You’ll Love This Red, White & Blue Trifle
There are about a dozen reasons this trifle has earned a permanent spot in my rotation, but here are the big ones that make it worth your time:
- Zero Baking Required — Seriously. If you can open a can of whipped cream or whip heavy cream, you can make this. No oven, no timer, no disaster risk. I’ve made this while simultaneously helping my kids with homework and grilling burgers. It just works.
- Looks Way Harder Than It Is — The layering effect is pure visual magic. Guests will assume you spent hours assembling it. I love that I can spend 15 minutes on it and still look like a culinary genius. It’s the ultimate hack for last-minute entertaining.
- Perfectly Balanced Sweetness — Some trifle recipes are cloyingly sweet. This one isn’t. The tartness of the berries cuts through the rich, tangy cream perfectly. It’s refreshing, not heavy. You can eat three layers and still have room for ice cream.
- Make-Ahead Friendly — This is actually better the next day. The flavors meld together, and the layers set up beautifully. I can assemble it the night before, pop it in the fridge, and walk into the party with dessert already done. That’s worth its weight in gold.
- Gluten-Free Friendly — Because this version skips the cake or ladyfingers, it’s naturally gluten-free. I serve it to my gluten-free friends with no worry, and they always ask for the recipe. It’s inclusive without feeling “diet-y.”
This trifle is my go-to when I want to treat my family to something special but don’t want to spend the whole weekend in the kitchen. It’s elegant, it’s festive, and it tastes like summer.
Ingredients You’ll Need
Here’s the best part: you probably have most of this already. I’m particular about three ingredients here, and I’ll tell you exactly why. The beauty of this Perfect Berry Trifle is its simplicity. You don’t need fancy gadgets or obscure pantry items. Just good-quality basics.
For the Cream Layer
- Heavy whipping cream (2 cups / 480ml) — This is non-negotiable. Don’t use half-and-half or milk; it won’t whip. Cold cream whips best, so keep it in the fridge until the last second. I like to chill my mixing bowl and beaters for 10 minutes beforehand for extra volume.
- Cream cheese (8 oz / 225g, softened) — This is the secret ingredient that gives the cream its tang and stability. It’s what keeps the layers from getting too runny. Use full-fat, block cream cheese, not the spreadable kind in a tub. It makes a huge difference in texture.
- Powdered sugar (½ cup / 60g) — Icing sugar dissolves instantly, unlike granulated sugar which might leave little gritty bits in your smooth cream. Taste your berries first; if they’re super sweet, you can reduce this to ¼ cup.
- Vanilla extract (1 teaspoon / 5ml) — Pure vanilla is key. If you’re using imitation, the flavor won’t be as rich. A little bit goes a long way.
For the Berry Layer

- Strawberries (1 pound / 450g) — I use half sliced thin for layering and half chopped small for mixing into the cream. Look for bright red, fragrant berries. If they’re dry or white, skip them. They need to be juicy.
- Raspberries (1 pint / 225g) — These add that gorgeous red pop and a nice tart contrast. Handle them gently; they bruise easily. I buy fresh ones whenever possible, but frozen works in a pinch (just thaw and drain well).
- Blueberries (1 pint / 225g) — The blue layer! They’re sturdy and don’t get mushy. I toss a handful in whole for visual impact and mix some into the cream for bursts of flavor.
For Garnish (Optional but Recommended)
- Mint leaves — Fresh mint adds a pop of green that makes the red, white, and blue colors sing. It also adds a fresh aroma that invites people to dig in.
- Extra whole berries — A few perfect strawberries and blueberries on top look professional and inviting.
Pro Tip: If you want a gluten-free cake layer, you can use store-bought gluten-free pound cake or angel food cake, crumbled. But honestly? The trifle is so good on its own that I rarely bother. It’s light, airy, and refreshing without the heaviness of bread.
Equipment Needed
You don’t need fancy equipment for this. Here’s what I actually use:
- Large glass trifle bowl or serving dish — A 6-quart bowl is ideal. I love glass because it shows off the layers. If you don’t have one, a large clear punch bowl or even individual glasses work great for a more intimate feel.
- Electric hand mixer or stand mixer — Hand-whipping cream is possible but tiring. A mixer gets it done in 2 minutes. I use my hand mixer because it’s easier to clean.
- Large mixing bowls — One for the cream, one for the berries. I keep a big one handy for tossing the fruit.
- Sharp knife and cutting board — For slicing strawberries. A serrated knife works best for soft berries.
- Spatula — A rubber spatula is essential for folding the cream gently so you don’t deflate it.
- Serving spoons — A large serving spoon for the trifle and a smaller one for garnishing.
Note: If you’re making this for a crowd, I recommend making two smaller trifle bowls instead of one giant one. It’s easier to serve and looks more abundant on the table.
How to Make It: Step-by-Step
Alright, let’s make this! I’m walking you through exactly how I do it, including the little tricks I’ve picked up over the years. It’s simple, but technique matters.
Step 1: Prep Your Berries (10 minutes)
Wash your strawberries, raspberries, and blueberries gently under cold water. Pat them dry with paper towels—moisture is the enemy of a good trifle. Hull the strawberries and slice them into thin, even slices. Chop a small handful of strawberries into bite-sized pieces. Leave the raspberries and blueberries whole. Set aside.
Step 2: Whip the Cream (5 minutes)
In a large, chilled bowl, combine the softened cream cheese, powdered sugar, and vanilla extract. Beat on medium-high speed until smooth and creamy, about 1 minute. Add the heavy whipping cream and beat on high speed until stiff peaks form. This should take 2-3 minutes. Don’t overbeat, or it’ll turn to butter. Stop when the peaks stand straight up when you lift the beater.
Step 3: Fold in the Fruit (2 minutes)
Gently fold the chopped strawberries and half of the blueberries into the cream mixture. Use a rubber spatula and fold slowly to keep the air in the cream. You want little swirls of fruit, not a uniform purple mess.
Step 4: Assemble the Layers (10 minutes)
Start with a layer of the cream mixture at the bottom of your trifle bowl, about 1 inch thick. Next, add a layer of sliced strawberries and whole raspberries. Then, add another layer of the cream mixture. Sprinkle a layer of blueberries over the cream. Repeat the layers until you’ve used all the ingredients, finishing with a final layer of cream on top.
Step 5: Garnish and Chill (30 minutes minimum)
Smooth the top layer of cream with a spatula. Decorate with whole strawberries, blueberries, and fresh mint leaves. Cover with plastic wrap and refrigerate for at least 30 minutes, or up to 24 hours. This chilling time allows the flavors to meld and the layers to set, making it easier to serve.
Total Time: About 30 minutes active, plus chilling time.
Expert Tips & Tricks
Here’s everything I’ve learned from making this dozens of times. These tips will save you from my mistakes.
Keep It Cold
Cream cheese and heavy cream are temperature-sensitive. If your kitchen is hot, work quickly. If the cream starts to look grainy, it’s too warm. Put the bowl in the fridge for 10 minutes and try again. Cold tools = better whip.
Fold, Don’t Stir
When adding fruit to the cream, use a gentle folding motion. Stirring vigorously will deflate the cream and make your trifle dense. You want it light and airy.
Don’t Skip the Chill Time
I know it’s tempting to dig in immediately, but let it rest. The layers set up, and the berries release a little juice that flavors the cream. It makes a noticeable difference in taste and texture.
Choose Ripe Berries
Use the ripest berries you can find. If they’re underripe, they’ll be sour and hard. If they’re overripe, they’ll be mushy. Look for vibrant color and a sweet smell. This trifle highlights the fruit, so it needs to be good.
Vary the Fruit
While I love the classic red, white, and blue combo, you can swap in blackberries, peaches, or even mango. Just keep the color balance in mind for that festive look.
Variations & Substitutions
Once you’ve nailed the basic version, here’s how you can mix it up. I’ve tried all of these.
Gluten-Free Cake Layer
Add a layer of crumbled gluten-free pound cake or angel food cake between the fruit and cream. This adds substance and makes it more like a traditional trifle. I use this version when feeding a hungry crowd.
Tropical Twist
Swap the berries for diced mango, pineapple, and kiwi. Use coconut cream instead of dairy cream for a vegan-friendly option. It’s a completely different vibe but just as refreshing.
Chocolate Lover’s
Add a layer of chocolate pudding or drizzle melted chocolate over the cream layer. Pair with strawberries and bananas for a classic combo. Great for kids.
Berry Swirl
Make a quick berry compote by simmering mixed berries with a little sugar and lemon juice. Swirl it into the cream before layering for a marbled effect. It’s pretty and adds a concentrated berry flavor.
Dairy-Free Option
Use coconut cream (the thick part from a can of full-fat coconut milk) and vegan cream cheese substitute. It’s richer and denser but still delicious. My lactose-intolerant friends love this version.
Serving & Storage
How to Serve
I usually serve this straight from the bowl at the dinner table—it looks rustic and stays cool. But here are other ways I’ve enjoyed it:
- Individual Glasses — Layer it in mason jars or dessert glasses for a party favor feel. Guests love taking their own portion home.
- With Coffee or Tea — It’s a perfect dessert after a light lunch or brunch.
- With a Splash of Champagne — For a fancy touch, add a layer of champagne-soaked cake or drizzle a little sparkling wine over the berries.
Storage Instructions
- Refrigerator — Store in an airtight container or covered with plastic wrap for up to 3 days. The berries will soften over time, but it’s still good. In fact, day 2 is often my favorite.
- Freezing — Not recommended. The cream will separate and become grainy when thawed. Make it fresh or store in the fridge.
Reheating
Do not reheat this dessert. It’s meant to be served cold. If it’s too cold from the fridge, let it sit at room temperature for 10 minutes before serving.
Nutrition Information
I’m not a nutritionist, but here’s the breakdown if you’re tracking. This is per serving (based on 8 servings).
| Nutrient | Amount |
|---|---|
| Calories | 280 |
| Protein | 4g |
| Carbs | 22g |
| Fiber | 3g |
| Sugar | 18g |
| Fat | 20g |
| Saturated Fat | 12g |
| Cholesterol | 65mg |
| Sodium | 45mg |
What’s Good: High in antioxidants from the berries. Good source of calcium from the dairy. It’s a lighter dessert option compared to cakes or pies.
What to Know: Higher in sugar and fat from the cream and cheese. If you’re watching calories, use light cream cheese and reduce the sugar. But honestly? It’s a treat. Enjoy it.
Final Thoughts
So that’s my go-to Perfect Berry Trifle! I’ve probably talked your ear off at this point, but when you make a recipe this often, you have a lot to say about it.
This has saved summer parties more times than I can count. It’s my answer to “what’s for dessert” when I’m tired, don’t want takeout, and still want something that looks really good. My guests are happy, my family’s happy, and I’m happy because I’m not stressed about cooking.
Make it yours! Try different berries, add a cake layer, or skip it entirely. The best recipes are the ones you adapt to your tastes. If you make this, drop a comment and let me know what you think! I love hearing how recipes turn out in your kitchen. And if something doesn’t work, tell me that too—I’m here to help troubleshoot.
Happy cooking! And I hope your kitchen smells half as good as mine does right now.
Frequently Asked Questions
Can I use frozen berries?
You can, but they’ll release more water and make the trifle soggy. If you must use frozen, thaw them completely and drain the excess liquid in a colander before using. Fresh berries are always better for texture.
Why did my cream not whip?
Usually, it’s because the cream or the bowl was too warm. Make sure your cream is very cold (below 40°F) and your bowl and beaters are chilled. Also, make sure you’re using heavy whipping cream with at least 30% fat content. Light cream won’t whip.
Can I make this ahead?
Yes! This trifle actually tastes better the next day. Assemble it up to 24 hours in advance. Cover tightly with plastic wrap and refrigerate. The flavors will meld, and the layers will set nicely.
Can I use a different fruit?
Absolutely! Try peaches, blackberries, or mixed berries. Just keep the color balance in mind if you want that red, white, and blue look. You can also add a layer of lemon curd or chocolate pudding for variety.
How do I slice strawberries evenly?
Use a sharp serrated knife. Cut the strawberry in half lengthwise, then slice each half into thin strips. This gives you uniform slices that look professional. If they’re too soft, chill them in the fridge for 10 minutes first to firm them up.
Can I add alcohol?
Yes! A splash of Kirsch (cherry brandy) or champagne in the cream layer adds a sophisticated touch. Or soak the berries in a little liqueur for 30 minutes before assembling. Just don’t overdo it—it’s a dessert, not a cocktail.
What kind of bowl should I use?
A glass trifle bowl is traditional and shows off the layers. But a large clear punch bowl, a glass mixing bowl, or even individual dessert glasses work great. The key is transparency so people can see the beautiful layers.
Pin This Recipe!


Perfect Berry Trifle: 3-Ingredient Red White & Blue Dessert
- Total Time: 45 minutes
- Yield: 8 servings 1x
Description
A no-bake, gluten-free berry trifle featuring layers of fresh strawberries, raspberries, and blueberries folded into a tangy, whipped cream cheese mixture. This elegant dessert is perfect for summer gatherings and requires minimal effort.
Ingredients
- 2 cups (480ml) heavy whipping cream, cold
- 8 oz (225g) cream cheese, softened (full-fat block)
- ½ cup (60g) powdered sugar
- 1 teaspoon vanilla extract
- 1 pound (450g) strawberries, sliced and chopped
- 1 pint (225g) raspberries
- 1 pint (225g) blueberries
- Fresh mint leaves for garnish (optional)
- Extra whole berries for garnish (optional)
Instructions
- Wash and dry strawberries, raspberries, and blueberries. Hull and slice half the strawberries thinly; chop the other half into small pieces. Leave raspberries and blueberries whole.
- In a large, chilled bowl, beat the softened cream cheese, powdered sugar, and vanilla extract on medium-high speed until smooth (about 1 minute).
- Add the cold heavy whipping cream and beat on high speed until stiff peaks form (2-3 minutes). Do not overbeat.
- Gently fold the chopped strawberries and half of the blueberries into the cream mixture using a rubber spatula.
- Assemble the trifle: Start with a layer of cream mixture in the bottom of a 6-quart glass trifle bowl. Add a layer of sliced strawberries and whole raspberries. Add another layer of cream, then a layer of blueberries. Repeat layers, finishing with cream on top.
- Garnish with whole strawberries, blueberries, and fresh mint leaves.
- Cover with plastic wrap and refrigerate for at least 30 minutes (or up to 24 hours) to allow flavors to meld and layers to set before serving.
Notes
Ensure all tools and cream are very cold for best whipping results. If using frozen berries, thaw completely and drain excess liquid to prevent sogginess. This dessert is best made ahead and stored in the refrigerator for up to 3 days. Do not freeze as the cream will separate.
- Prep Time: 15 minutes
- Cook Time: 0 minutes
- Category: Dessert
- Cuisine: American
Nutrition
- Serving Size: 1 serving
- Calories: 280
- Sugar: 18
- Sodium: 45
- Fat: 20
- Saturated Fat: 12
- Carbohydrates: 22
- Fiber: 3
- Protein: 4
Keywords: berry trifle, red white blue dessert, no bake dessert, summer dessert, gluten free dessert, easy trifle, patriotic dessert, labor day dessert


